
Table of Contents
Introduction
I needed to set up a GitLab server in a lab some weeks ago. At first, I didn’t feel the need of using a certificate to secure the connectivity but when I started to use the embedded Docker registry, I wasn’t able to get it working. A Docker registry is using SSL certificates by default.
I thought it can’t be that complicated to create a self-signed certificate but then the fun started … I couldn’t really find good documentation and I somehow needed to use a trial & error approach to solve it.
If you are thinking of using a GitLab server with your own self-signed certificates, then this is the right article for you and it will save you a lot of time.
My server is based on Ubuntu 22.04 with GitLab CE 15.8.
Generate the certificates
You need to generate:
- CA (Certificate Authority)
- Server certificate
You will need to have the tool “certtool”, which is one way to generate the certificates.
Create a new directory in the GitLab folder where the certificates get stored and create a file for the default values in the certificate. We need to have a SAN (Subject Alternative Name). In my case, I will use the IP address.
					sudo mkdir /etc/gitlab/ssl/
cd /etc/gitlab/ssl

sudo touch server-certificate.template
ip_address = "10.122.49.112"
expiration_days = 360
					$ sudo apt-get install gnutls-bin
$ sudo certtool --generate-privkey --outfile ca.key
Generating a 3072 bit RSA private key...
Please see the highlighted lines in the following output:
					$ sudo certtool --generate-self-signed --load-privkey ca.key --outfile ca.crt
Generating a self signed certificate...
Please enter the details of the certificate's distinguished name. Just press enter to ignore a field.
Country name (2 chars): DE
State or province name: NRW
Locality name:
Organization name:
Organizational unit name:
Common name:
UID:
Enter the subject's domain component (DC):
This field should not be used in new certificates.
E-mail:
Enter the certificate's serial number in decimal (123) or hex (0xabcd)
(default is 0x2234344dda861e09c405946fd218a39dda7cf0cd)
value:


Activation/Expiration time.
The certificate will expire in (days): 3650


Extensions.
Does the certificate belong to an authority? (y/N): y
Path length constraint (decimal, -1 for no constraint):
Is this a TLS web client certificate? (y/N):
Will the certificate be used for IPsec IKE operations? (y/N):
Is this a TLS web server certificate? (y/N):
Enter a dnsName of the subject of the certificate: some-domain.tld
Enter a URI of the subject of the certificate:
Enter the IP address of the subject of the certificate: xxx.xxx.xxx.xxx
Enter the e-mail of the subject of the certificate:
Will the certificate be used for signing (required for TLS)? (Y/n):
Will the certificate be used for data encryption? (y/N):
Will the certificate be used to sign OCSP requests? (y/N):
Will the certificate be used to sign code? (y/N):
Will the certificate be used for time stamping? (y/N):
Will the certificate be used for email protection? (y/N):
Will the certificate be used to sign other certificates? (Y/n): y
Will the certificate be used to sign CRLs? (y/N):
Enter the URI of the CRL distribution point:
X.509 Certificate Information:
	Version: 3
	Serial Number (hex): 2234344dda861e09c405946fd218a39dda7cf0cd
	Validity:
		Not Before: Sun Feb 12 16:38:09 UTC 2023
		Not After: Wed Feb 09 16:38:12 UTC 2033
	Subject: ST=NRW,C=DE
	Subject Public Key Algorithm: RSA
	Algorithm Security Level: High (3072 bits)
		Modulus (bits 3072):
			00:dc:a5:8b:c1:ec:55:15:d1:90:e9:50:b8:b6:9b:b1
			7d:c1:f0:a1:a4:a5:73:f8:26:a3:99:fd:0c:92:89:3e
			d0:0c:da:9d:a1:23:e5:fa:48:89:f0:0b:45:02:bb:9c
			5e:d9:58:8c:93:e1:05:47:40:d2:15:3f:b6:1c:b8:89
			1f:16:09:33:12:16:63:5a:a3:10:b1:f5:72:9a:1f:26
			62:b5:96:64:13:1f:59:b0:a4:76:ae:ff:82:df:32:c1
			e4:f3:82:eb:66:ab:96:d2:4e:1c:5c:03:f5:ec:10:89
			64:0d:a1:b7:26:3c:34:db:73:e8:91:60:9c:87:b5:61
			15:b3:c8:c0:c4:d0:cf:bb:12:c5:67:90:fa:e2:a2:a1
			0a:fd:35:94:88:f9:25:d9:09:fd:30:6a:b6:33:67:04
			a5:f4:5d:98:a2:a9:3f:bb:c7:b6:ef:da:40:19:42:98
			4c:af:e4:fb:e7:a8:b2:07:59:65:f7:83:35:ea:0f:31
			1b:1a:5f:02:eb:93:6b:ba:5f:8a:85:1e:67:ee:ea:71
			7c:ec:c3:4f:2d:3e:4c:d9:97:54:f0:60:f8:24:c9:c7
			6a:f0:80:5e:ab:97:6a:a2:76:06:cd:28:13:42:da:c7
			35:87:35:27:ce:42:ba:47:da:c8:80:8f:43:7c:63:78
			0e:6b:fc:38:82:d3:3c:23:0a:3a:12:d8:65:19:15:c7
			1f:f0:4b:8d:1e:d2:5a:19:26:cb:ab:80:d2:80:13:35
			1b:bb:ff:f9:39:06:96:41:58:be:c8:eb:bc:68:04:95
			73:75:06:9e:1b:a7:4c:65:9c:c9:a3:49:cc:ed:13:a9
			5e:ef:5e:f2:0b:21:01:5d:19:42:11:f7:63:eb:ba:b9
			90:d8:04:f5:60:35:dc:73:47:89:26:c2:af:4f:7e:f0
			b6:a4:56:7e:45:46:a8:87:e1:c5:72:2d:e9:ca:bf:6b
			61:ff:d0:48:b7:27:e5:20:e3:62:b0:17:7d:a6:0a:c4
			4d
		Exponent (bits 24):
			01:00:01
	Extensions:
		Basic Constraints (critical):
			Certificate Authority (CA): TRUE
		Subject Alternative Name (not critical):
			IPAddress: 10.122.49.112
		Key Usage (critical):
			Digital signature.
			Certificate signing.
		Subject Key Identifier (not critical):
			70985171457644ab6ec558d2fe0e40ba48ac729b
Other Information:
	Public Key ID:
		sha1:70985171457644ab6ec558d2fe0e40ba48ac729b
		sha256:21b2bea7ba18f8a5855d463bba0ee1dc459117f96bf5a54527000be9e50f9d12
	Public Key PIN:
		pin-sha256:IbK+p7oY+KWFXUY7ug7h3EWRF/lr9aVFJwAL6eUPnRI=

Is the above information ok? (y/N): y


Signing certificate...
Great, you created your own CA now! Let’s continue with the server certificate.
$ sudo certtool --generate-privkey --outfile 10.122.49.112.key
$ sudo certtool --generate-request --load-privkey 10.122.49.112.key --outfile request.pem
					$ certtool --generate-request --load-privkey 10.122.49.112.key --outfile request.pem
Generating a PKCS #10 certificate request...
Country name (2 chars): DE
State or province name: NRW
Locality name:
Organization name:
Organizational unit name:
Common name:
UID:
Enter the subject's domain component (DC):
Enter a dnsName of the subject of the certificate:
Enter a URI of the subject of the certificate:
Enter the IP address of the subject of the certificate: 10.122.49.112
Enter the e-mail of the subject of the certificate:
Enter a challenge password:
Does the certificate belong to an authority? (y/N): N
Will the certificate be used for signing (DHE ciphersuites)? (Y/n):
Will the certificate be used for encryption (RSA ciphersuites)? (Y/n):
Will the certificate be used to sign code? (y/N):
Will the certificate be used for time stamping? (y/N):
Will the certificate be used for email protection? (y/N):
Will the certificate be used for IPsec IKE operations? (y/N):
Will the certificate be used to sign OCSP requests? (y/N):
Is this a TLS web client certificate? (y/N): y
Is this a TLS web server certificate? (y/N): y
					$ sudo certtool --generate-certificate --load-request request.pem --outfile 10.122.49.112.crt --load-ca-certificate ca.crt --load-ca-privkey ca.key  --template server-certificate.template
Generating a signed certificate...
X.509 Certificate Information:
	Version: 3
	Serial Number (hex): 5c9a31fa79b3996121150525897904bfd547e078
	Validity:
		Not Before: Mon Feb 13 12:49:54 UTC 2023
		Not After: Thu Feb 08 12:49:54 UTC 2024
	Subject: ST=NRW,C=DE
	Subject Public Key Algorithm: RSA
	Algorithm Security Level: High (3072 bits)
		Modulus (bits 3072):
			00:9f:db:9b:33:f9:65:6c:2a:15:c3:f4:cd:15:07:c5
			71:47:9c:24:36:74:7d:84:40:72:53:e5:2f:64:7c:96
			e0:1f:a2:e8:d8:f2:aa:5f:00:6b:e6:65:2d:9b:94:28
			d1:1b:9c:cb:8b:d1:39:f3:00:52:b1:14:21:5d:15:aa
			71:37:20:38:90:d0:95:c5:80:67:9c:2a:db:81:f7:dc
			65:b4:97:8f:6d:b5:02:26:7d:a1:55:c2:da:82:7a:e0
			ed:cb:1c:e6:98:86:2e:21:0d:fa:05:72:09:8d:09:37
			29:16:e1:74:53:a2:b3:38:3b:72:43:78:1d:8d:44:79
			e8:2f:c1:fa:d6:c9:d7:ee:c6:12:34:87:a5:d3:cf:3e
			eb:7a:a4:64:f6:3a:61:33:31:e5:42:d7:9a:93:bc:db
			4b:ca:85:a8:d3:f0:ad:70:f3:6a:46:45:97:53:ee:43
			14:d6:a8:e0:44:cf:f5:3d:fe:0e:97:fa:3f:39:5c:7f
			10:1b:ca:6c:89:d1:4a:e1:49:00:35:63:dd:10:65:68
			ab:c2:af:a2:bd:de:a1:d8:23:cb:1c:99:35:6e:cf:2b
			a4:01:f1:22:39:ee:f8:25:8f:5c:41:87:49:03:5a:54
			18:09:ab:ab:bb:d8:af:2f:e1:e1:f8:75:a2:7f:69:1e
			3f:2b:b7:35:a5:97:a1:ab:ab:7f:7e:99:ed:9f:cc:57
			af:fd:ac:cb:d6:48:38:ed:ad:94:50:35:2a:ec:dc:5b
			7f:4c:3b:c1:fb:eb:8a:a9:50:57:0b:7b:51:3d:70:f8
			98:aa:56:30:55:3d:f0:8b:78:aa:b4:70:ca:ff:5c:96
			ce:b0:af:a8:1e:5f:b1:7e:cc:9b:87:a3:0a:fb:fe:b8
			d4:2b:fc:60:4a:04:aa:44:e8:17:3a:12:71:39:93:42
			e9:24:2d:19:79:eb:49:54:53:ce:0e:a2:ac:bb:12:34
			26:71:d3:41:47:cc:03:62:ec:10:83:ba:d8:8a:b0:46
			3d
		Exponent (bits 24):
			01:00:01
	Extensions:
		Basic Constraints (critical):
			Certificate Authority (CA): FALSE
		Subject Alternative Name (not critical):
			IPAddress: 10.122.49.112
		Subject Key Identifier (not critical):
			e8ee53b50fbbd3f0886f826b46ac8e1569154471
		Authority Key Identifier (not critical):
			70985171457644ab6ec558d2fe0e40ba48ac729b
Other Information:
	Public Key ID:
		sha1:e8ee53b50fbbd3f0886f826b46ac8e1569154471
		sha256:e9254cf51721ce8f201eeba7f6d941a5afd6f9a73f781fb2b8b964326af94a79
	Public Key PIN:
		pin-sha256:6SVM9Rchzo8gHuun9tlBpa/W+ac/eB+yuLlkMmr5Snk=

Signing certificate...
Change the GitLab server config
Now you need to change the GitLab server config in order to use the new certificates. The GitLab server config is located in /etc/gitlab/gitlab.rb after applying the changes the GitLab server needs to be reconfigured and restarted.
Open the /etc/gitlab/gitlab.rb file and change the following lines:
					$ sudo vi /etc/gitlab/gitlab.rb

 external_url 'https://10.122.49.112'
 nginx['ssl_certificate'] = "/etc/gitlab/ssl/#{node['fqdn']}.crt"
 nginx['ssl_certificate_key'] = "/etc/gitlab/ssl/#{node['fqdn']}.key"
Now it makes more sense why you set the .key and .crt server certificate files to the IP address. In my lab, I do not have any DNS server that’s why I will access the server via the IP directly. The GitLab server is using the variable defined in the external URL (#{node[‘fqdn’]}.crt).
You can also define the filename manually but then you need to remove the variable definition “#{node[‘fqdn’]}.crt“.
After the changes, save the config and reconfigure the server.
					$ sudo gitlab-ctl reconfigure

....
....

[2023-02-13T13:26:56+00:00] INFO: Cinc Client Run complete in 22.174210125 seconds

Running handlers:
[2023-02-13T13:26:57+00:00] INFO: Running report handlers
Running handlers complete
[2023-02-13T13:26:57+00:00] INFO: Report handlers complete
Infra Phase complete, 4/851 resources updated in 25 seconds
gitlab Reconfigured!
Validate the server status with the following command:
					$ sudo gitlab-ctl status | grep nginx
run: nginx: (pid 1380) 659379s; run: log: (pid 1369) 659379s
See the documentation for more available gitlab-ctl commands:
https://docs.gitlab.com/omnibus/maintenance/
Activate the Docker Registry
As your certificates are in place, you can proceed and activate the Docker registry by changing the /etc/gitlab/gitlab.rb again the reconfigure the GitLab server.
Of course, change the config according to your DNS or IP.
					$ sudo vi /etc/gitlab/gitlab.rb

 registry_external_url 'https://10.122.49.112:5050'
 registry_nginx['enable'] = true
 registry_nginx['listen_port'] = 5050
Reconfigure the server and check the GitLab server status:
					$ sudo gitlab-ctl reconfigure

....
....

Running handlers:
[2023-02-13T13:45:14+00:00] INFO: Running report handlers
Running handlers complete
[2023-02-13T13:45:14+00:00] INFO: Report handlers complete
Infra Phase complete, 1/851 resources updated in 26 seconds
gitlab Reconfigured!

$ sudo gitlab-ctl status | grep 'nginx\|registry'

run: nginx: (pid 1380) 660259s; run: log: (pid 1369) 660259s
run: registry: (pid 1399) 660259s; run: log: (pid 1384) 660259s
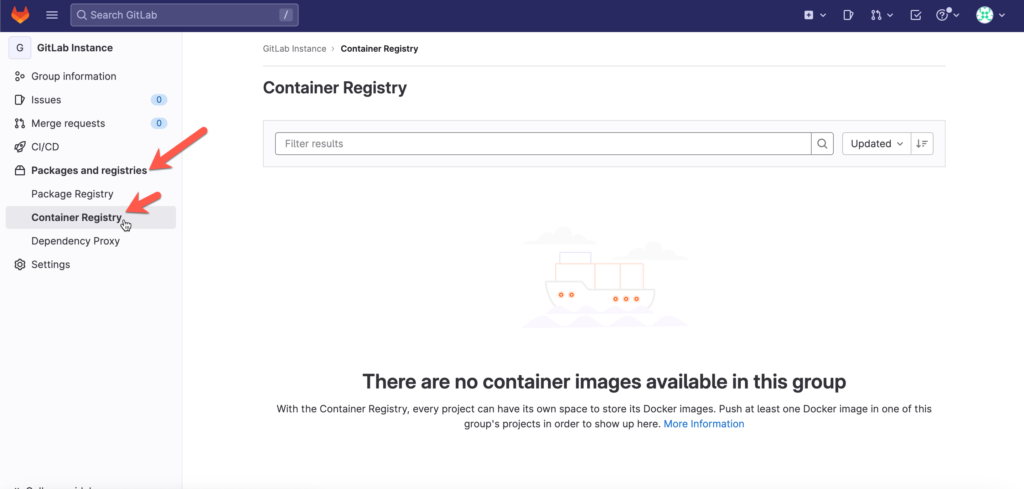
Go to your GitLab UI and validate if the registry is available:
Let Docker accept your self-signed certificate
Per default, Docker will not accept your self-signed certificate. You need to create a folder with your CA in order to make Docker aware that your certificate is valid. For that reason, you create a folder of your trusted Docker registry and copy your CA into the folder.
If you will not copy the CA in the folder. You will receive the following error:
Registry fails with x509 certificate signed by unknown authority
					sudo mkdir -p /etc/docker/certs.d/10.122.49.112:5050
sudo cp /etc/gitlab/ssl/ca.crt /etc/docker/certs.d/10.122.49.112:5050/
Let GitLab runners accept your self-signed certificate
The same error will occur when you want to register your GitLab runner:
Post “https://10.122.49.112/api/v4/runners”: x509: certificate signed by unknown authority
Please use the following command in order to register your GitLab runner successfully:
sudo gitlab-runner register --tls-ca-file="/etc/gitlab/ssl/ca.crt"

One Response
Thank you for the great article!
Would it be easier to add the CA certificate to the runner’s OS trust store?
Is it possible to stay Gitlab itself on HTTP and enable Container registry?