Table of Contents
Introduction
Alright, let’s get down to business 🚀 ! In this part, I will show you how an end-to-end pipeline can be built using the digital-twin approach.
I will use the following scenario as an example:
A network administrator by the name of Pawel finds himself entrusted with the responsibility of expanding the configuration on a VPC back-to-back environment in the data center. Awaiting their network configurations, new servers stand ready to be integrated into the environment.
Pawel’s mission is threefold: to create a new VLAN specifically tailored for these servers, configure the ports with this VLAN, and establish SVIs on each Nexus switch.
While these tasks may appear to be a walk in the park for seasoned network administrators, Pawel, being a recent addition to the company, is determined to prove his mettle and ensure his first assignment is a resounding success.
In pursuit of this goal, Pawel meticulously approaches each step, embracing the challenges and opportunities that come with being the company’s newest network administrator. With a keen eye for detail and an unwavering commitment to excellence, Pawel sets out to make a lasting impression on his colleagues and demonstrate that he has what it takes to succeed in his new role.
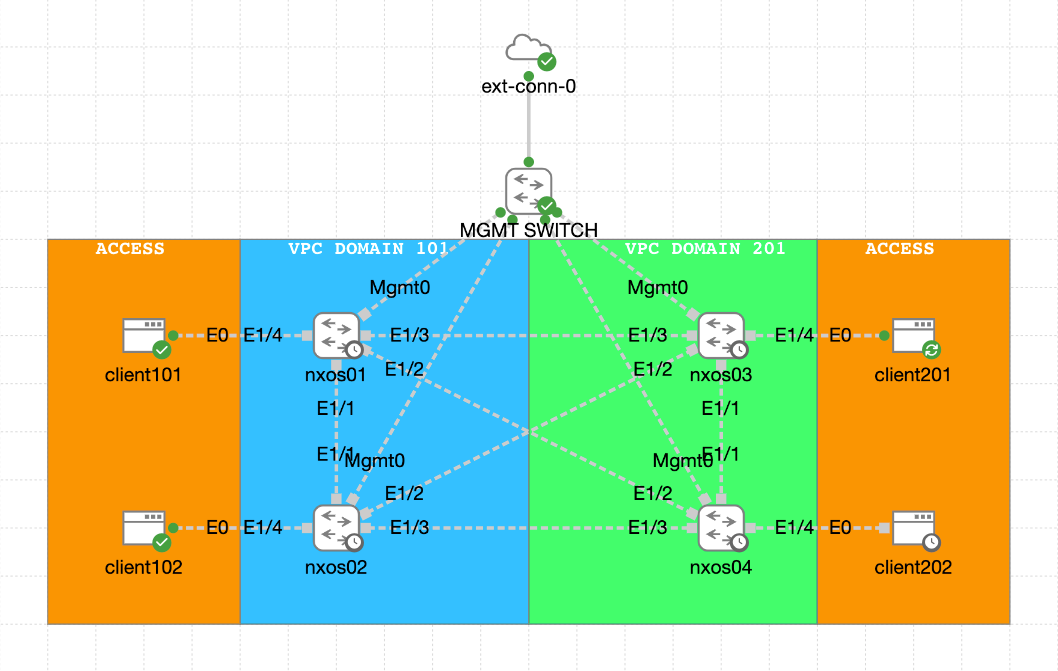
To give a better idea, the network diagram looks like this:

The importance of separating data from code
When working with automation, it’s important to separate data from the code that processes it. This makes everything easier to manage and maintain in the future.
One way to help with this separation is by using a data model, like OpenConfig. OpenConfig is a standard that makes it simpler to manage network devices from different vendors using the same set of rules.
By using OpenConfig, you can manage and automate your network more easily, no matter what devices you’re working with. This makes your automation tasks more organized, efficient, and multi-vendor friendly.
In my particular use case, I have opted to craft a custom data model tailored specifically for this scenario, ensuring a seamless fit with my requirements and offering a personalized touch to address the challenges at hand.
The following example shows the data model for one Nexus device:
					---

NXOS01:
  feature:
    - feature_name: interface-vlan
  vlan:
    - vlan_id: 172
      vlan_name: "VLAN172"
  interfaces:
    - name: Ethernet1/4
      type: access
      vlan: 172
  interface_vlan:
    - name: vlan 172
      address: 172.16.16.211
      netmask: 255.255.255.0
Choosing the right toolset
Finding the right tools for automation can be tough when you’re new to it. Focus on your goal and what you want to achieve. Your first solution might not be perfect, but it’s better to start and learn from it than to do nothing at all. Keep trying, and you’ll improve your automation skills over time.
My advice to you:
- Purpose: Determine the specific tasks you want to automate and ensure the tool can support them
- Vendor support: Check the compatibility and integration of the automation tool with your current implemented solutions
- Scalability: Ensure the tool can scale with your business needs and growth
- Customization: Check if the tool can be customized to meet your specific requirements
In this use case, I am going to use the following toolset:
- CML (Cisco Modeling Lab) as a network simulation software to create the digital twin
- Ansible as a configuration tool for the digital twin creation as well as the Nexus devices
- Robot framework to execute functional testing on the devices
- GitLab as my CI/CD tool (as you most probably could see from my recent posts 😜)
The steps that are involved
To successfully execute the desired use case, the following steps are needed:
Docker file construction and registry upload: Create a Docker file that encapsulates all dependencies and configurations required for your project. Once built, upload it to the Docker registry to ensure easy deployment and consistency across environments.
Ansible file linting: Review and check all Ansible files for syntax, best practices, and potential errors. Linting will help maintain high code quality and reduce the possibility of unforeseen issues during execution.
Digital twin creation in CML: Utilize Ansible to create a digital twin within Cisco Modeling Labs (CML), providing a virtual replica of your production environment. This allows for testing and validation of configurations without affecting the live system.
Nexus device configuration: Apply the necessary configurations to the Nexus devices in the digital twin environment using Ansible. This process will ensure that the devices are set up correctly and ready for testing.
VLAN and VLAN interface validation: Implement the Robot framework to test whether the VLAN and VLAN interface have been created correctly. This step helps confirm that your configurations are functional and error-free.
Production Nexus device configuration: Once the digital twin environment has been thoroughly tested and validated, apply the same configurations to the production Nexus devices. This step ensures that the live environment is aligned with the successful digital twin setup.
Production environment testing: Run the same test cases used in the digital twin environment on the production setup. This process validates that the configurations work as intended in the live environment, further ensuring system stability and reliability.
Digital twin removal in CML: After successfully implementing and validating the configurations in both the digital twin and production environments, delete the digital twin in CML. This action keeps your workspace clean and efficient, minimizing resource usage.
Build the pipeline
Given the extensive collection of files involved in this project, I will highlight just a few key examples with their content.
⭐ To explore the complete set of files, please visit my GitHub repository at: beye.blog/brkops-2317 ⭐
The list of files are the following:
					├── Dockerfile
├── README.md
├── ansible
│   ├── 00_create_CML_lab.yaml
│   ├── 01_config_devices.yaml
│   ├── 02_delete_CML_lab.yaml
│   ├── ansible.cfg
│   ├── data
│   │   ├── brkops-2317_digital-twin.yaml
│   │   └── switch_configuration.yaml
│   ├── group_vars
│   │   ├── cml_host.yaml
│   │   ├── digital_twin.yaml
│   │   └── production.yaml
│   ├── inventory
│   ├── inventory_digital-twin
│   └── inventory_production
└── robot_framework
    ├── testbed_digital-twin.yaml
    ├── testbed_production.yaml
    ├── testcases_digital-twin.robot
    └── testcases_production.robot
Dockerfile
As usual, I am creating my own Docker image which hosts all the tools that are needed for the project.
					FROM ubuntu:22.04

RUN apt-get update && \
  apt-get install -y gcc python3.11 git && \
  apt-get install -y python3-pip ssh && \
  pip3 install --upgrade pip && \
  pip3 install ansible requests && \
  pip3 install ansible-pylibssh && \
  pip3 install pyats[full] && \
  pip3 install ansible-lint && \
  pip3 install virl2-client==2.4.0 && \
  ansible-galaxy collection install cisco.nxos && \
  ansible-galaxy collection install cisco.cml
Ansible
First, you need to create the CML digital twin this is done by loading the lab file YAML file into the CML controller. The devices will boot with a basic configuration which includes the user and password as well as the IP address for the management interface to access the devices.
This takes some time make sure to set the command_timeout parameter with a higher value for example 1800.
- name: Build the topology
hosts: localhost
connection: local
gather_facts: false
vars:
cml_lab_file: data/brkops-2317_digital-twin.yaml
cml_lab: BRKOPS-2317_DIGITAL-TWIN
startup: 'all'
wait: 'no'
cml_login: &cml_login
host: xyz.xyz.xyz.xyz
user: user
password: password
tasks:
- name: Check for the lab file # Check lab file exists
ansible.builtin.stat:
path: "{{ cml_lab_file }}"
register: stat_result
delegate_to: localhost
- name: Check for the CML host, credentials, and topology file # Check CML host, credentials, and topology file are defined
ansible.builtin.assert:
that:
- stat_result.stat.exists
- cml_login.host != ""
- cml_login.user != ""
- cml_login.password != ""
- cml_lab != ""
msg: "CML host, credentials, and topology file are required. Verify the requirements in README are met."
delegate_to: localhost
- name: Create the lab # Create the lab
cisco.cml.cml_lab:
<<: lab: cml_lab state: if startup="=" else file: cml_lab_file topology: lookup wait: register: results name: check to see the lab is there cisco.cml.cml_lab_facts: cml_lab_facts when: wait bool>
</:>
This will import and boot the digital twin environment.
Following that, Ansible takes charge of configuring the devices by seamlessly loading the defined data model and iterating through the values.
Load variables: It loads the switch configuration data from the
data/switch_configuration.yamlfile and stores it in theswitch_configurationvariable.Show version command: The playbook runs the
show versionandshow interface mgmt0commands on the targeted Cisco Nexus devices and stores the output in theshow_version_outputvariable. It retries up to 50 times with a 30-second delay between attempts until the commands are successful.Create VLAN: The playbook creates VLANs on the Nexus devices based on the data stored in the
switch_configurationvariable.Configure interface: It configures the interfaces as specified in the
switch_configurationvariable, setting a description, and enabling them.Configure access VLAN on interface: The playbook assigns the access VLANs to the interfaces as specified in the
switch_configurationvariable.Ensure the feature is enabled: It ensures that the required features (e.g., interface-vlan) are enabled on the Nexus devices as specified in the
switch_configurationvariable.Configure VLAN interface: Finally, the playbook configures the VLAN interfaces (SVI) with their respective IP addresses and netmasks as specified in the
switch_configurationvariable, and ensures they are not in shutdown state.
In summary, this playbook automates the process of configuring VLANs, interfaces, and related settings on Cisco Nexus devices, using the data defined in the switch_configuration.yaml file.
Execute the playbook using the appropriate inventory file and group, ensuring a precise and targeted configuration process:
					---

- name: Configure VLAN and interface # Configure devices
  hosts: "{{ host_var|default([]) }}"
  gather_facts: false
  serial: 1
  order: sorted

  tasks:

    - name: Load variables # Load fabric data from file
      ansible.builtin.include_vars:
        file: data/switch_configuration.yaml
        name: switch_configuration

    - name: Show version command
      cisco.nxos.nxos_command:
        commands:
          - show version
          - show interface mgmt0
      register: show_version_output
      until: show_version_output is success
      retries: 50
      delay: 30

    - name: Display the show version output
      ansible.builtin.debug:
        var: show_version_output.stdout_lines


    - name: Create VLAN # Create VLAN
      cisco.nxos.nxos_vlans:
        config:
          - vlan_id: '{{ item.vlan_id }}'
            name: '{{ item.vlan_name }}'
        state: merged
      with_items:
        - '{{ switch_configuration[inventory_hostname].vlan }}'

    - name: Configure interface # Configure interface
      cisco.nxos.nxos_interfaces:
        config:
        - name: '{{ item.name }}'
          description: Configured by Ansible
          enabled: true
      with_items:
        - '{{ switch_configuration[inventory_hostname].interfaces }}'

    - name: Configure access VLAN on interface # Configure access VLAN on interface
      cisco.nxos.nxos_l2_interfaces:
        config:
          - name: '{{ item.name }}'
            access:
              vlan: '{{ item.vlan }}'
        state: merged
      with_items:
        - '{{ switch_configuration[inventory_hostname].interfaces }}'

    - name: Ensure the feature is enabled # Ensure the feature is enabled
      cisco.nxos.nxos_feature:
        feature: '{{ item.feature_name }}'
        state: enabled
      with_items:
        - '{{ switch_configuration[inventory_hostname].feature }}'

    - name: Configure VLAN interface # Configure VLAN interface
      cisco.nxos.nxos_config:
        lines:
          - interface {{ item.name }}
          - ip address {{ item.address }} {{ item.netmask }}
          - no shutdown
      with_items:
        - '{{ switch_configuration[inventory_hostname].interface_vlan }}'
At the end of the process the CML digital twin will be deleted to release resources.
---
- name: Delete the topology
hosts: localhost
connection: local
gather_facts: false
vars:
cml_lab: BRKOPS-2317_DIGITAL-TWIN
startup: 'all'
wait: 'no'
cml_login: &cml_login
host: xyz.xyz.xyz.xyz
user: user
password: password
tasks:
- name: Check for the CML host, credentials, and topology file # Check CML host, credentials, and topology file are defined
ansible.builtin.assert:
that:
- stat_result.stat.exists
- cml_login.host != ""
- cml_login.user != ""
- cml_login.password != ""
- cml_lab != ""
msg: "CML host, credentials, and topology file are required. Verify the requirements in README are met."
delegate_to: localhost
- name: Delete the lab # Create the lab
cisco.cml.cml_lab:
<<: lab: cml_lab state: topology: lookup cml_lab_file register: results>
</:>
Robot framework test cases
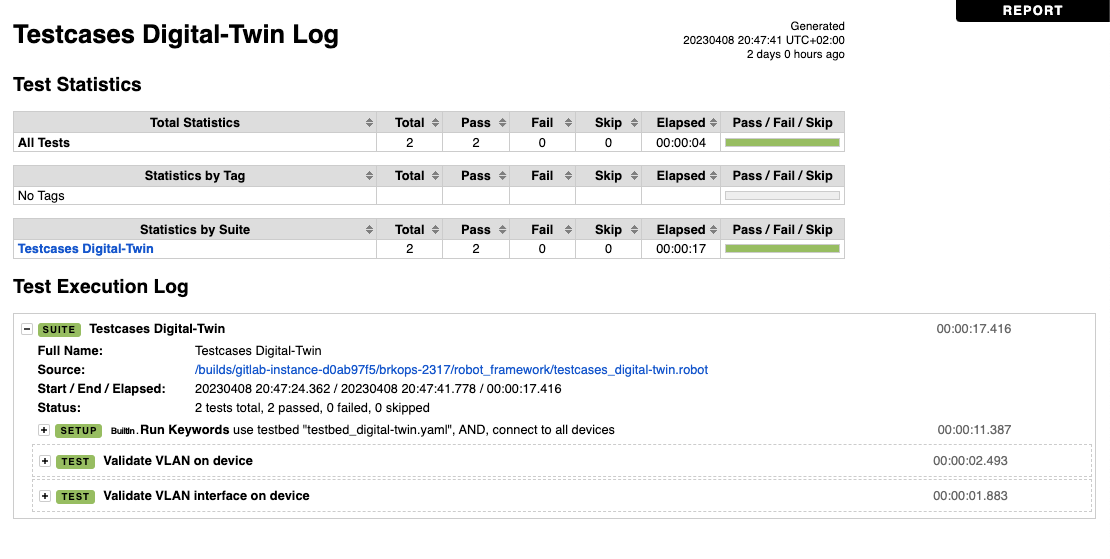
This Robot Framework test suite validates the presence of a specified VLAN and its corresponding VLAN interface on a set of Cisco Nexus devices, ensuring that the network configurations are properly applied and functional.
Settings: The suite imports necessary libraries, including
pyATSRobot,UniconRobot, andGenieRobot, which are essential for interacting with Cisco devices and parsing their output.Suite Setup: The suite setup defines a keyword chain to load the testbed file
testbed_digital-twin.yamland establish connections to all devices specified in the testbed.Variables: The suite specifies variables, including a list of devices (
DEVICES), the target VLAN ID (VLAN_ID), and the target VLAN name (VLAN_NAME).-
Test Cases:
Validate VLAN on device: This test case iterates through the devices listed in the
DEVICESvariable. It executes theshow vlancommand on each device and parses the output. The test then uses a Data Query (DQ) to filter and find the target VLAN ID in the parsed data. The test case passes if the target VLAN ID is found, otherwise, it fails with the message “VLAN not found.”Validate VLAN interface on device: This test case also iterates through the devices listed in the
DEVICESvariable. It executes theshow interface vlan 172command on each device and parses the output. The test checks if the link state of the VLAN interface is “up” and if the parsed data contains the target VLAN interface. The test case passes if both conditions are met, otherwise, it fails with the message “VLAN interface not found.”
					*** Settings ***
Library         pyats.robot.pyATSRobot
Library         unicon.robot.UniconRobot
Library         genie.libs.robot.GenieRobot

Suite Setup    Run Keywords    use testbed "testbed_digital-twin.yaml"    AND    connect to all devices

*** Variables ***
@{DEVICES}         nxos01    nxos02    nxos03    nxos04
${VLAN_ID}         172
${VLAN_NAME}       VLAN172

*** Test Cases ***
Validate VLAN on device
    FOR    ${DEVICE}    IN    @{DEVICES}
        ${output}=      parse "show vlan" on device "${DEVICE}"
        ${response}=      dq query    data=${output}    filters=contains('${VLAN_ID}')
        Should Not Be Empty    ${response}    msg=VLAN not found
    END

Validate VLAN interface on device
    FOR    ${DEVICE}    IN    @{DEVICES}
        ${output}=      parse "show interface vlan 172" on device "${DEVICE}"
        Should be Equal    ${output}[Vlan172][link_state]    up
        Should Not Be Empty    ${output}    msg=VLAN interface not found
    END
GitLab pipeline file
This GitLab CI/CD pipeline automates the process of creating, configuring, testing, and deleting a digital twin environment for a network setup using Cisco Nexus devices. The pipeline consists of several stages and jobs:
Build: In this stage, two jobs (
build_imageandpush_image) build a Docker image containing the necessary dependencies and configurations for the project and push it to the GitLab registry.Linting: The
ansible_lintingjob checks the Ansible playbook for syntax, best practices, and potential errors to ensure high code quality.Create Digital Twin: The
create_digital-twinjob uses Ansible to create a digital twin within Cisco Modeling Labs (CML), providing a virtual replica of the production environment for testing.Configure Digital Twin: The
configure_digital-twinjob applies the necessary configurations to the Nexus devices in the digital twin environment using Ansible.Test Digital Twin: The
testcases_digital-twinjob runs Robot Framework test cases to validate the VLAN and VLAN interface configurations on the Nexus devices in the digital twin environment.Configure Production: The
configure_productionjob applies the validated configurations to the production Nexus devices.Test Production: The
testcases_productionjob runs the same test cases as in the digital twin environment, now on the production setup, to ensure the configurations work as intended in the live environment.Delete Digital Twin: The
delete_digital-twinjob removes the digital twin from the CML environment after successful implementation and validation of the configurations in both digital twin and production environments.

					workflow:
  rules:
    - changes:
      - data/switch_configuration.yaml
    - if: $CI_COMMIT_BRANCH != "main" && $CI_PIPELINE_SOURCE != "merge_request_event"
      when: never
    - when: always

variables:
  IMAGE_NAME_ANSIBLE: $CI_REGISTRY_IMAGE/ansible
  IMAGE_TAG_ANSIBLE: "1.0"

stages:
  - build
  - linting
  - create_digital-twin
  - configure_digital-twin
  - test_digital-twin
  - configure_production
  - test_production
  - delete_digital-twin

build_image:
  stage: build
  tags:
    - local-runner
  script:
    - docker build -t $IMAGE_NAME_ANSIBLE:$IMAGE_TAG_ANSIBLE .

push_image:
  stage: build
  needs:
    - build_image
  tags:
    - local-runner
  before_script:
    - docker login -u $CI_REGISTRY_USER -p $CI_REGISTRY_PASSWORD $CI_REGISTRY
  script:
    - docker push $IMAGE_NAME_ANSIBLE:$IMAGE_TAG_ANSIBLE

ansible_linting:
  stage: linting
  image: $IMAGE_NAME_ANSIBLE:$IMAGE_TAG_ANSIBLE
  needs:
    - push_image
  tags:
    - docker-runner
  before_script:
    - cd ansible
  script:
    - ansible-lint --profile=min 00_create_CML_lab.yaml


create_digital-twin:
  stage: create_digital-twin
  image: $IMAGE_NAME_ANSIBLE:$IMAGE_TAG_ANSIBLE
  needs:
    - ansible_linting
  environment: CML
  tags:
    - docker-runner
  before_script:
    - cd ansible
    - unset http_proxy
    - unset http_proxys
  script:
    - ansible-playbook 00_create_CML_lab.yaml

configure_digital-twin:
  stage: create_digital-twin
  image: $IMAGE_NAME_ANSIBLE:$IMAGE_TAG_ANSIBLE
  needs:
    - create_digital-twin
  environment: CML
  tags:
    - docker-runner
  before_script:
    - cd ansible
  script:
    - ansible-playbook 01_config_devices.yaml -i inventory_digital-twin --extra-vars "host_var=digital_twin"

testcases_digital-twin:
  stage: test_digital-twin
  image: $IMAGE_NAME_ANSIBLE:$IMAGE_TAG_ANSIBLE
  needs:
    - configure_digital-twin
  environment: CML
  tags:
    - docker-runner
  before_script:
    - cd robot_framework
    - mkdir reports_digital-twin
  script:
    - robot --outputdir reports_digital-twin/ testcases_digital-twin.robot
  artifacts:
    untracked: false
    when: always
    expire_in: "1 days"
    paths:
      - "$CI_BUILDS_DIR/$CI_PROJECT_PATH/robot_framework/reports_digital-twin/log.html"
      - "$CI_BUILDS_DIR/$CI_PROJECT_PATH/robot_framework/reports_digital-twin/report.html"

configure_production:
  stage: configure_production
  image: $IMAGE_NAME_ANSIBLE:$IMAGE_TAG_ANSIBLE
  needs:
    - testcases_digital-twin
  environment: CML
  tags:
    - docker-runner
  before_script:
    - cd ansible
  script:
    - ansible-playbook 01_config_devices.yaml -i inventory_production --extra-vars "host_var=production"

testcases_production:
  stage: test_production
  image: $IMAGE_NAME_ANSIBLE:$IMAGE_TAG_ANSIBLE
  needs:
    - configure_production
  environment: CML
  tags:
    - docker-runner
  before_script:
    - cd robot_framework
    - mkdir reports_production
  script:
    - robot --outputdir reports_production/ testcases_production.robot
  artifacts:
    untracked: false
    when: always
    expire_in: "1 days"
    paths:
      - "$CI_BUILDS_DIR/$CI_PROJECT_PATH/robot_framework/reports_production/log.html"
      - "$CI_BUILDS_DIR/$CI_PROJECT_PATH/robot_framework/reports_production/report.html"

delete_digital-twin:
  stage: delete_digital-twin
  image: $IMAGE_NAME_ANSIBLE:$IMAGE_TAG_ANSIBLE
  needs:
    - testcases_production
  environment: CML
  tags:
    - docker-runner
  before_script:
    - cd ansible
    - unset http_proxy
    - unset http_proxys
  script:
    - ansible-playbook 02_delete_CML_lab.yaml
Summary and next steps
This process demonstrates the simplicity and effectiveness of establishing a workflow that incorporates a digital twin approach. It’s an excellent method for validating and testing network changes before they wreak havoc, saving network administrators from potential headaches and sleepless nights.
By the way, our hero Pawel emerged victorious, ensuring the application team could deploy their servers on time for the project. The day was saved, and Pawel earned himself a well-deserved reputation for reliability and competence, all thanks to the power of digital twins and a bit of automation magic!
But wait, is this the grand finale of my blog series? Absolutely not! In my next article, we’ll dive headfirst into even more challenging territory, tackling the deployment of a BGP EVPN fabric using a Cisco Nexus Dashboard fabric controller.
Buckle up and hold onto your hats, because we’re about to take network automation and digital twins to new heights.
So, stay tuned, and don’t miss the next exciting episode in our ongoing journey through the captivating world of network automation!
References
Part 3 is coming soon ➡️