Table of Contents
Introduction
This will be one of my final posts in the Proxmox series, but I couldn’t finish without covering a crucial topic—backups. 🛡️
Let’s be honest: backups are often an afterthought, something we only think about when things go south, data disappears, or a strange combination of events leads to disaster. Way back in the day, I worked as a SAN/back storage admin, so I know better than most the importance of solid backup strategies. Yet, despite that experience, I successfully ignored proper backups for years—fortunately, without major incidents. 😅
But as my home lab setup grew and became more complex, I realized it was time to step up my game. Proxmox has all the tools I need to build a solid disaster recovery (DR) plan, so why not use them?
Let’s dive into the strategy I’ve built using Proxmox’s powerful features to ensure my data is safe, no matter what happens.
Proxmox backup server
First, it’s important to mention that Proxmox already comes with a built-in backup solution, which for most users is more than sufficient. It allows you to create backups, schedule them, and even set up automatic snapshots. However, for those who want a more advanced, dedicated backup solution, Proxmox offers the Proxmox Backup Server (PBS).
So, why is Proxmox Backup Server an improvement? Let me walk you through some key features that make it a more robust option:
Deduplication: One of the standout features of Proxmox Backup Server is its ability to deduplicate data. This means that only unique data blocks are stored, significantly reducing the storage footprint, especially for large virtual machines that have similar data across backups.
Incremental Backups: PBS offers incremental backups, which only store the differences between backups rather than duplicating entire virtual machine data. This not only saves space but also speeds up the backup process.
Compression: To save even more space, PBS supports compression. Data is compressed before it’s stored, helping to reduce the storage requirements and optimizing resource usage.
Encrypted Backups: For enhanced security, Proxmox Backup Server offers encryption of your backups, ensuring that your data is safe both in storage and during transfer.
Efficient Restore: PBS allows you to quickly restore entire VMs or even individual files. This flexibility ensures that you can recover your data as fast as possible in case of an emergency.
API and Remote Management: Proxmox Backup Server offers a robust API and allows for remote management, making it easier to integrate into your existing infrastructure and automate tasks.
These features make PBS an excellent choice if you’re looking for more control, efficiency, and security for your backup strategy in a home lab or even in more demanding environments.
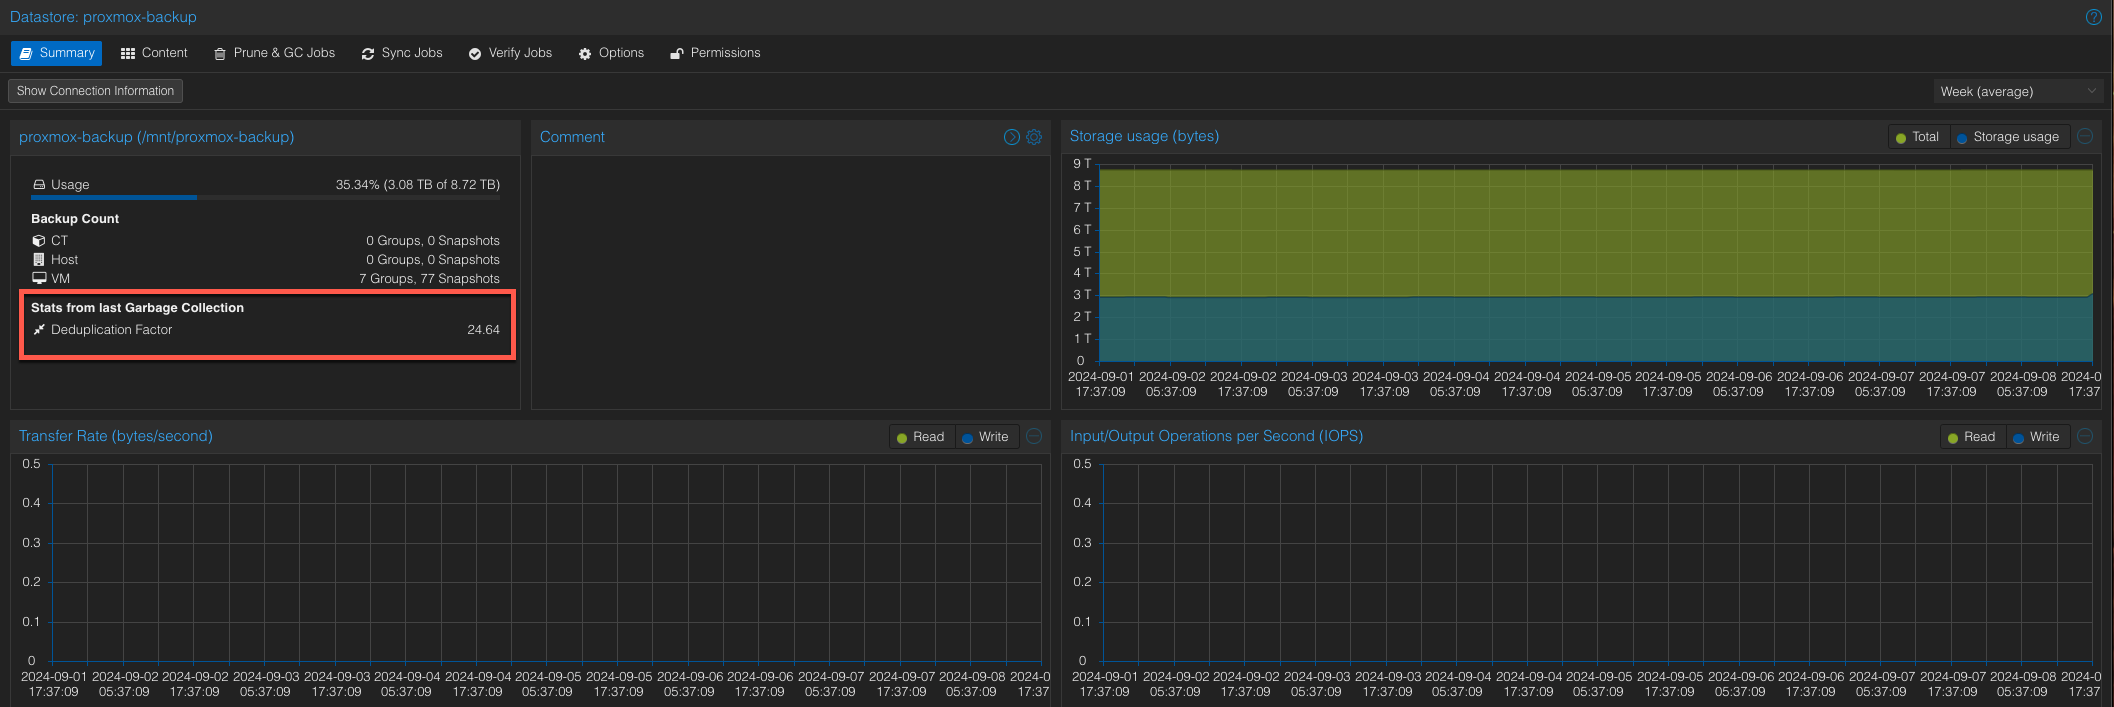
I am running my PBS since the beginning. Here are some of my backups stats:
Implementation
Now, let’s get down to business. Setting up Proxmox Backup Server (PBS) is straightforward—just upload the PBS appliance and walk through the setup wizard. Proxmox makes it simple, and you’ll be up and running in no time.
Once you’ve completed the initial setup, the next step is to mount an NFS share to the PBS machine. This ensures you have a designated storage location for all your backups. To make the mount persistent, you’ll need to edit the fstab file.
Here’s how to mount the NFS share and make it persistent across reboots:
- Mount the NFS Share:
-
Make the NFS Mount Persistent: Add the following entry to
/etc/fstab
					mount -t nfs 192.168.1.218:/proxmox-backup /mnt/proxmox-backup
echo "192.168.1.218:/proxmox-backup /mnt/proxmox-backup nfs vers=3,nouser,atime,auto,retrans=2,rw,dev,exec 0 0" >> /etc/fstab
This step ensures that the NFS share will automatically mount after a reboot, keeping your backup storage always accessible.
-
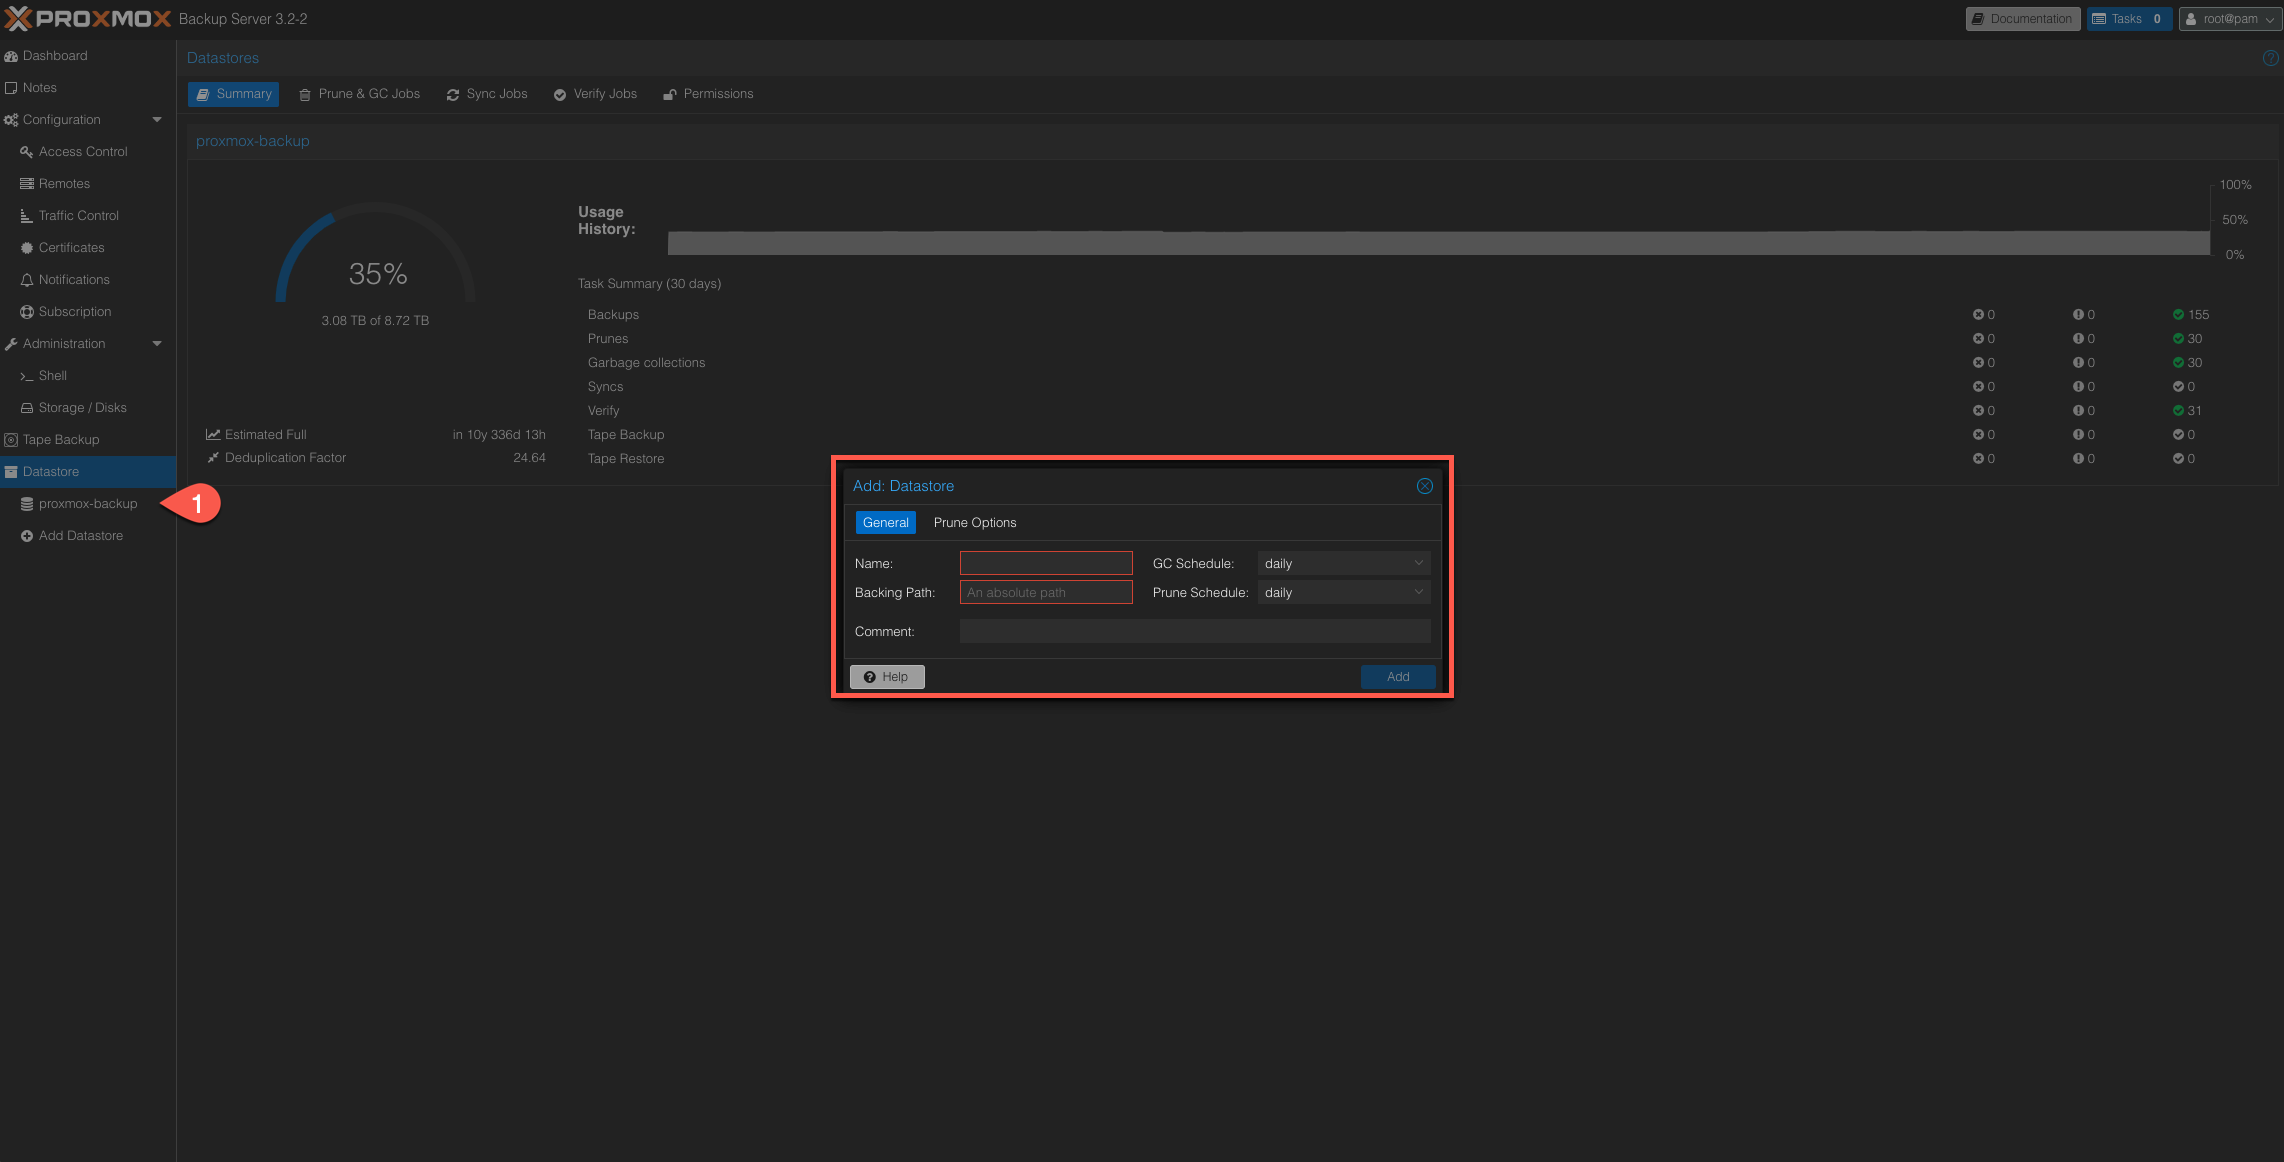
Add the Storage in Proxmox: After mounting the NFS share, head over to the Proxmox Backup Server interface and add a new storage location, pointing it to the local path
/mnt/proxmox-backup. This allows Proxmox to utilize the NFS share for backups.
Once configured, your backups will flow seamlessly into your mounted storage. Below is a screenshot showing how to configure the storage path in Proxmox Backup Server.
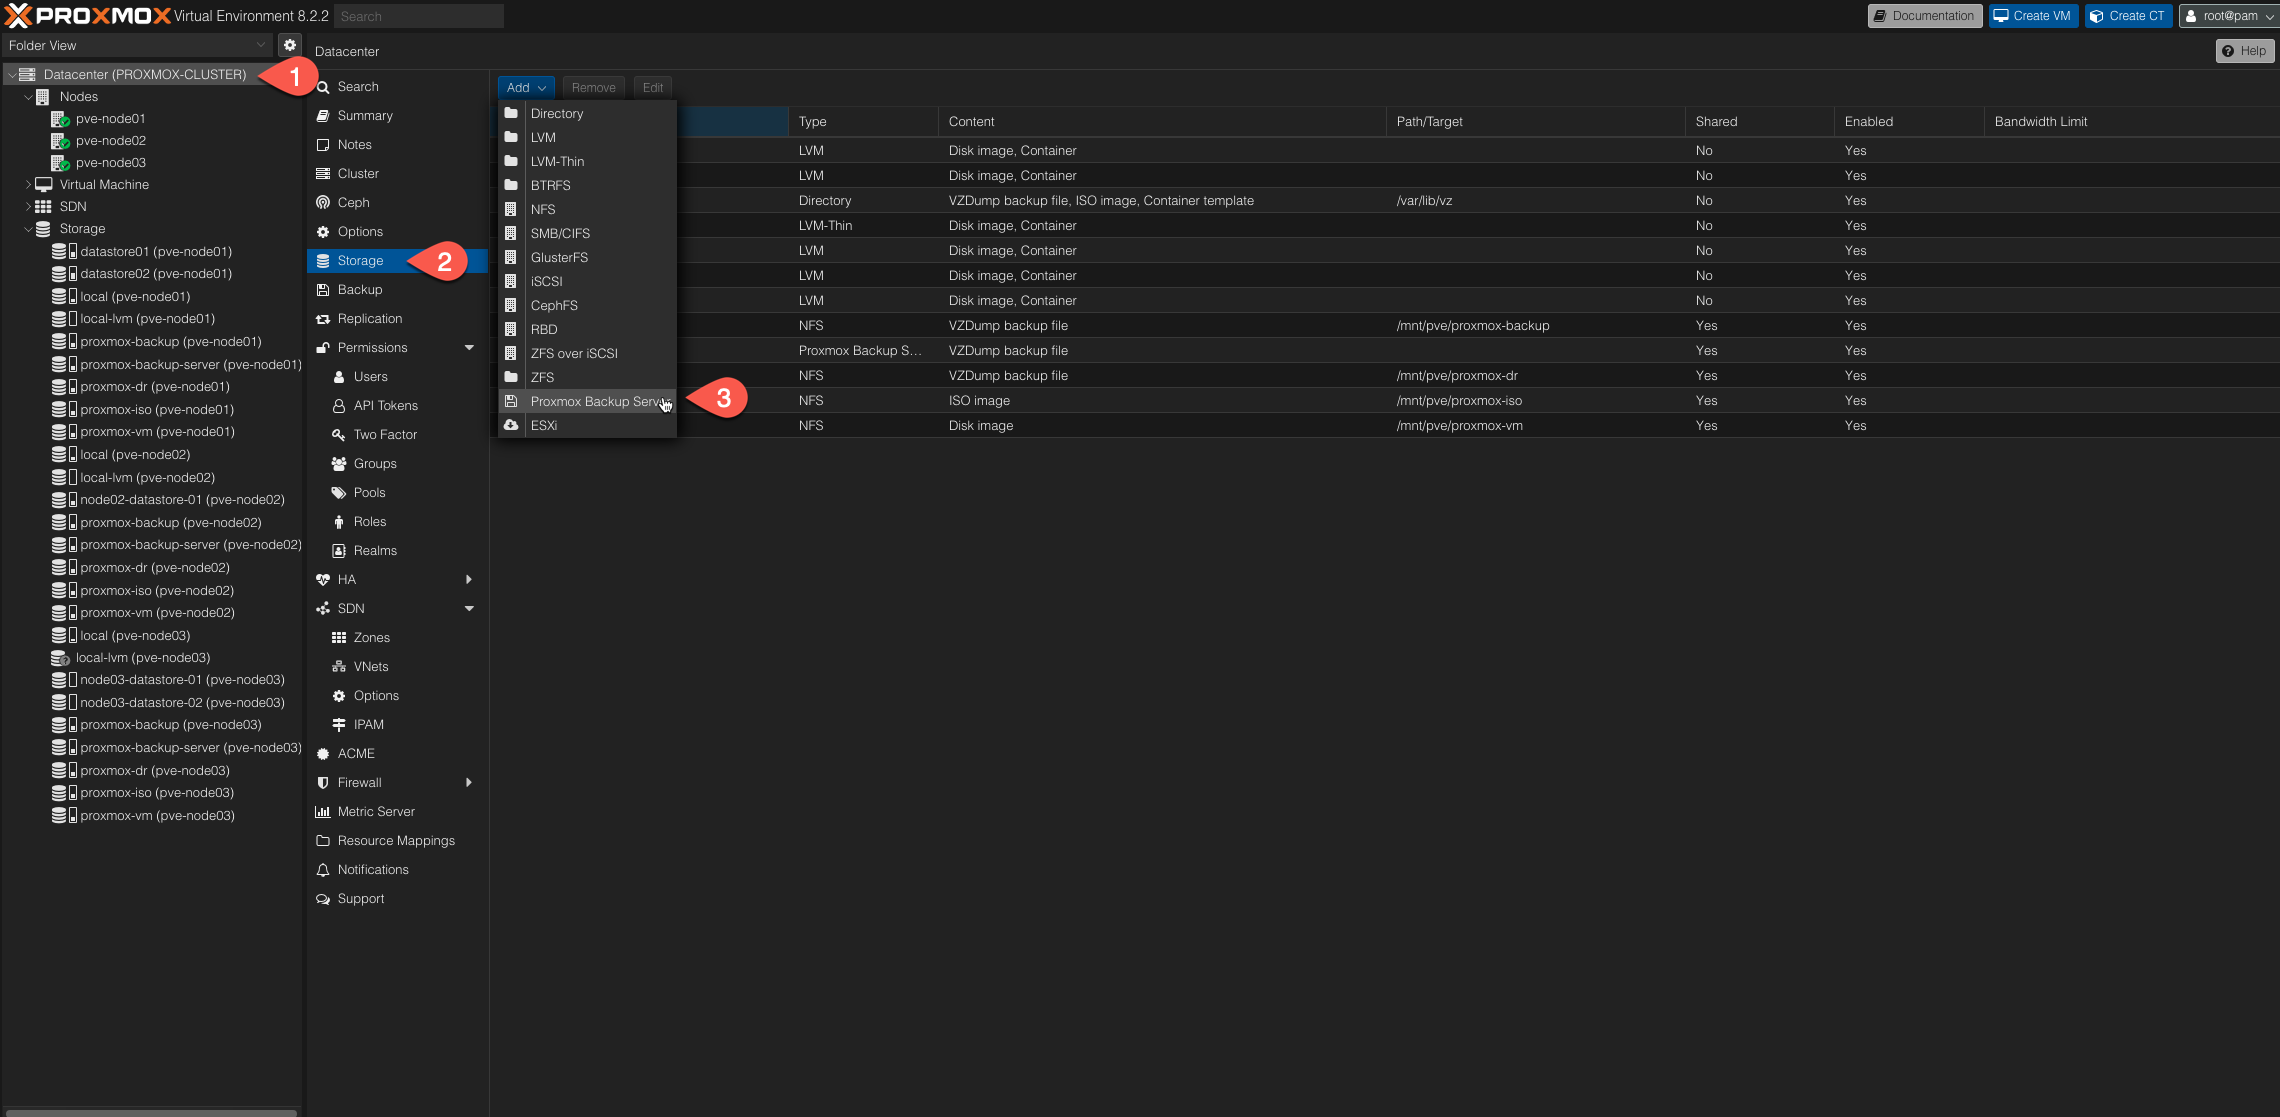
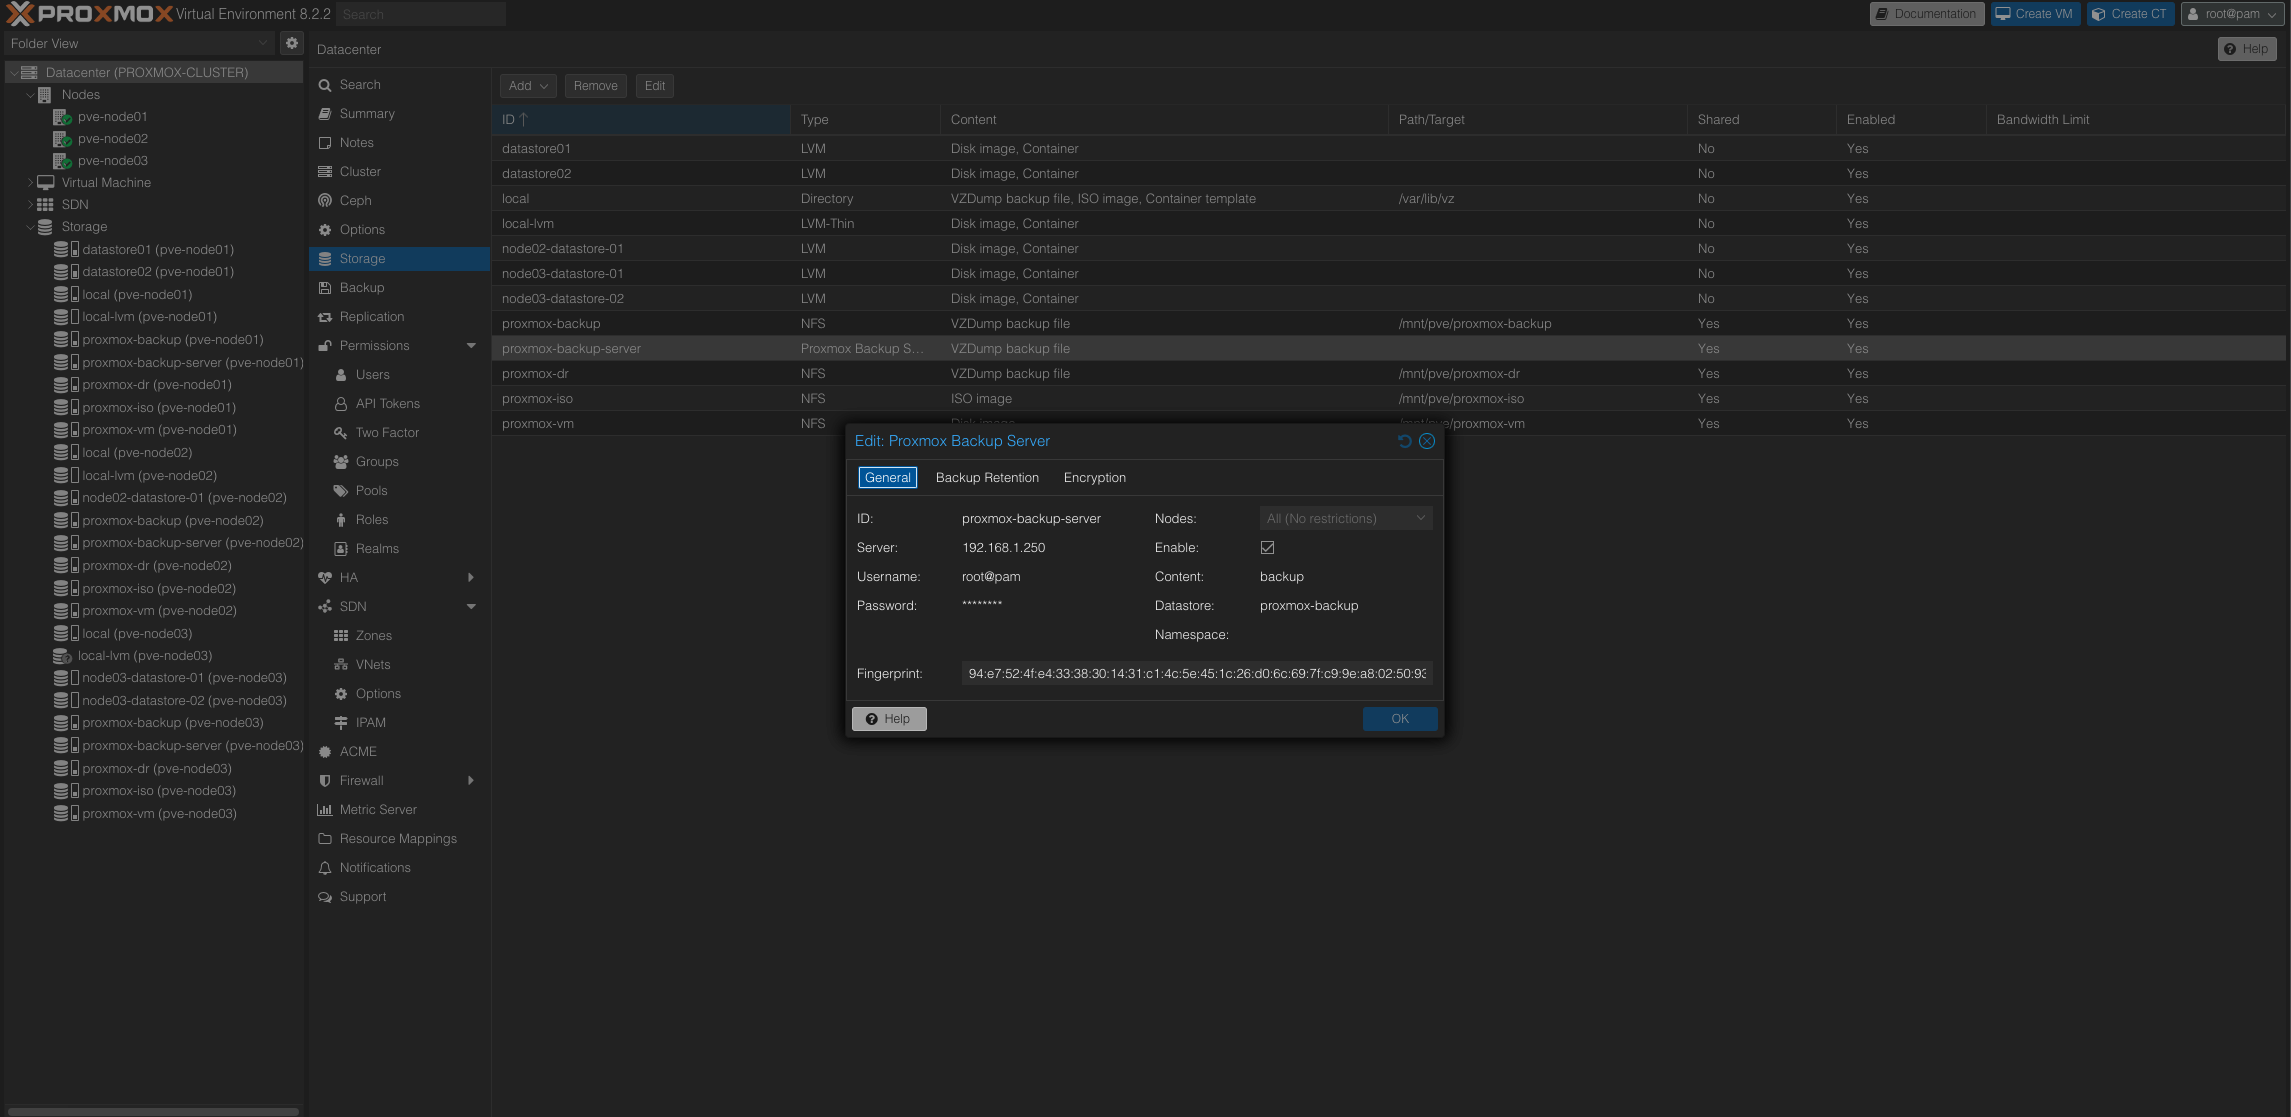
Great, now that the NFS share is mounted and storage has been set up, the next step is to integrate the Proxmox Backup Server (PBS) with your Proxmox cluster. This is easily done by adding the PBS as a storage option in Proxmox, as shown in the picture below.
Once PBS is added to the cluster, the next critical task is to create a backup schedule. This allows you to automate the process, ensuring that your VMs are regularly backed up without manual intervention. Check out the screenshot below for how to set up a backup schedule in Proxmox.
Make sure not to set any retention in the job itself! This will be done in PBS.
Backup Plan: Preparing for Disaster Recovery
Wow, is that it? Well, yes—sometimes IT can be simple! But wait a minute—what’s the actual backup plan here? How do we make sure everything is recoverable in case of a disaster?
Setting up the PBS is one thing, but having a Disaster Recovery (DR) plan in place is equally important. It’s not just about backing up data; it’s about ensuring you can restore everything quickly and efficiently in the event of failure. In the next section, we’ll dive into my specific disaster recovery strategy and how Proxmox Backup Server plays a crucial role.
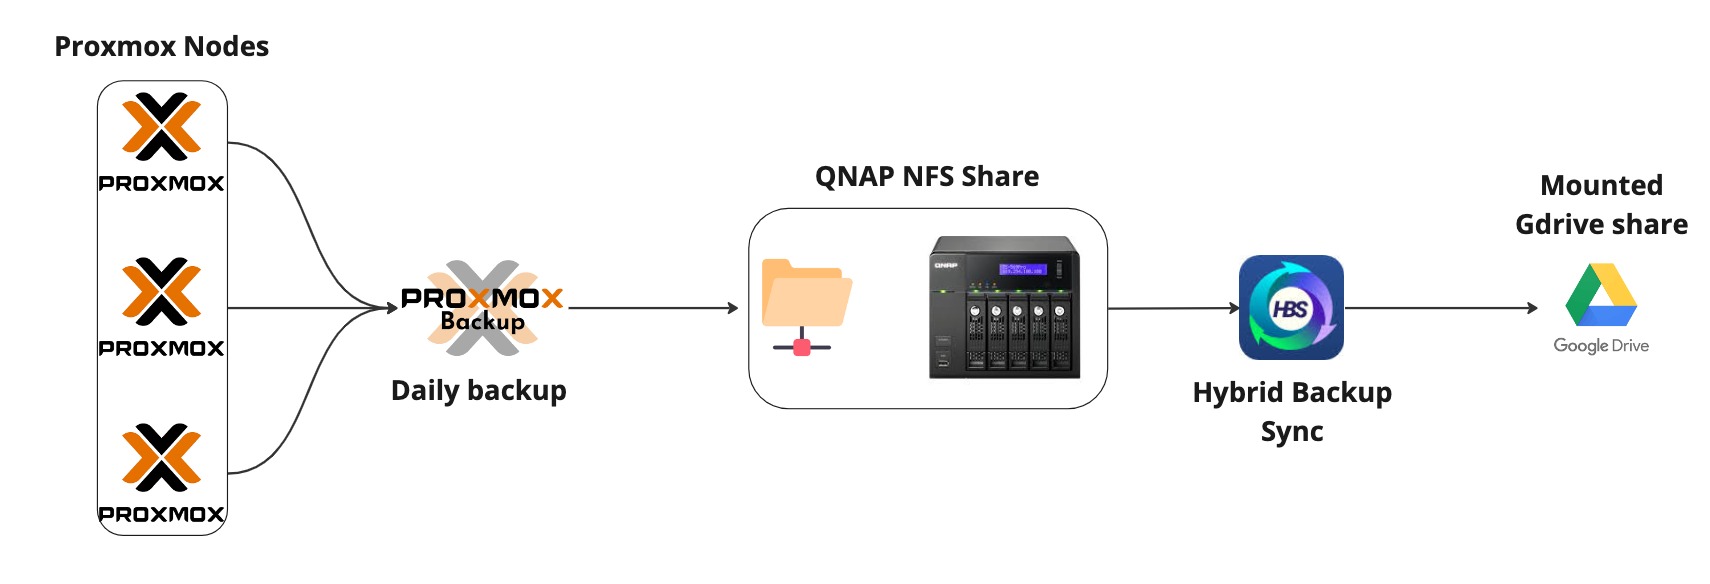
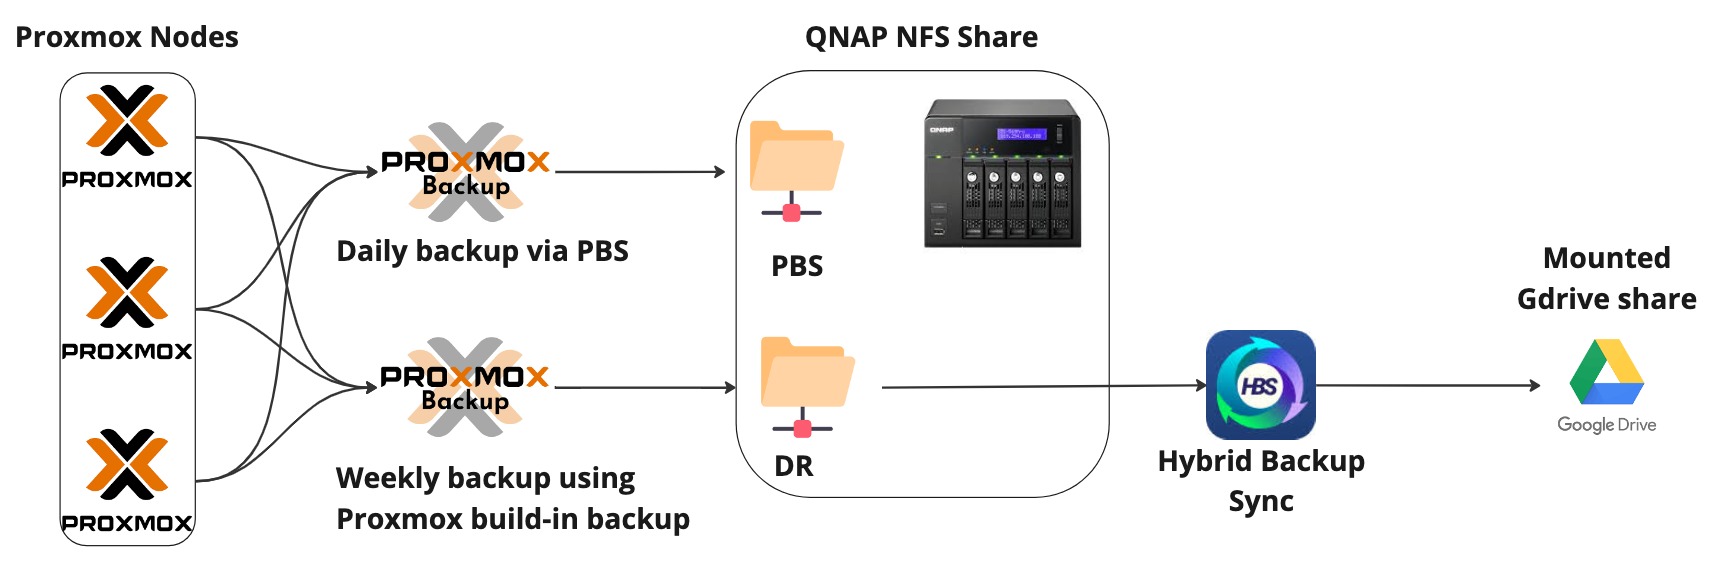
Proxmox Nodes: These represent multiple servers configured to send backups.
Proxmox Backup: All Proxmox nodes back up their data daily to a Proxmox Backup Server (PBS).
QNAP NFS Share: The Proxmox Backup Server then sends the backups to a network-attached storage (NAS) device, specifically a QNAP server, using an NFS share.
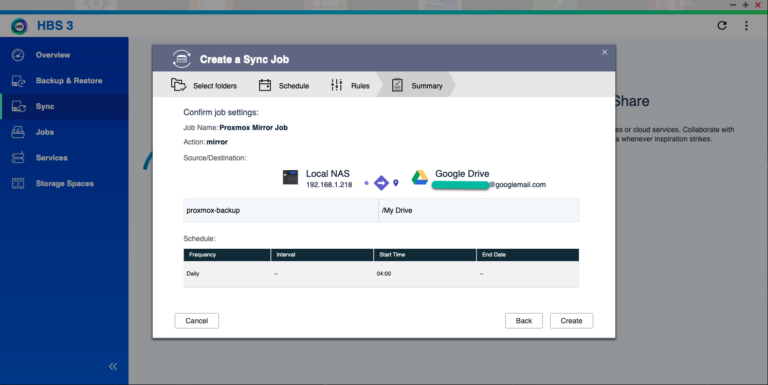
Hybrid Backup Sync (HBS): On the QNAP device, Hybrid Backup Sync is set up to handle further synchronization. This tool automates the backup and replication processes to additional storage locations. The final step in the process is syncing the backups to a Google Drive account via HBS. This offers an additional layer of redundancy by storing the backup data in the cloud, ensuring offsite disaster recovery.
This setup ensures that daily backups are stored locally on the QNAP server and are also mirrored to Google Drive for enhanced security and disaster recovery options.
Lessons Learned
I wouldn’t write this blog post if I didn’t have some key lessons learned from the process. What initially looked good on the drawing board didn’t translate as well in practice.
Here’s where things went off track: Proxmox Backup Server (PBS) stores all the deduplicated data chunks in a hidden .chunks folder. My original plan was to use Hybrid Backup Sync (HBS) to mirror the backups to my Google Drive. However, HBS couldn’t sync this hidden folder as part of the backup job. You would think a “mirror” job would include everything, but that wasn’t the case.
Even if I could sync it, the sheer number of files was overwhelming. As of now, the .chunks folder has 253,247 files, which is far from practical to sync daily. The process of calculating changes for all those files would take hours, making it highly inefficient.
Also, since the sync to Google Drive is purely for Disaster Recovery (DR) purposes, I asked myself: Do I really need the entire history and every version of the VM? Probably not. In most DR scenarios, the latest working state of the VM is more than enough.
The Solution
Instead of syncing the entire PBS content, I created a second backup job that bypasses PBS. This job directly dumps the backups onto the NFS share and keeps only two versions of each backup (just in case). This folder is much smaller, making it practical to sync to Google Drive.
This way, I get the redundancy I need without the unnecessary overhead of syncing hundreds of thousands of files every day.
Do not include the PBS VM in your backup plan. Create a separate backup job that dumps the PBS in an NFS share using Proxmox default backup feature.
Summary
In this post, I discuss the importance of having a reliable backup plan for your Proxmox environment, highlighting how crucial it is, especially for disaster recovery (DR). After initially ignoring backups, I recognized the need for a comprehensive strategy and implemented Proxmox Backup Server (PBS).
PBS offers advanced features like deduplication and incremental backups, but there were practical issues when trying to sync the backup data to cloud storage. The .chunks folder created by PBS contains hundreds of thousands of files, making daily syncs impractical. In response, I revised my strategy by creating a separate backup job that bypasses PBS and directly dumps VM backups to an NFS share. This reduced the number of files to be synced and simplified the DR process, focusing on only keeping the latest two backup versions.
The result is a more efficient, practical backup solution that meets the needs of both daily operations and disaster recovery scenarios, while avoiding the complexities and overhead of syncing large numbers of files.
What Comes Next? Testing Recovery!
All the backups in the world are useless if your recovery fails when you need it most. So the next essential step is to test your recovery process. I recommend restoring a VM from both the Proxmox Backup Server (PBS) and from your DR backup (e.g., the NFS share synced with Google Drive). This will ensure that your backup plan is truly effective, because a backup plan is only as good as your ability to successfully restore the data.
Additionally, it’s a good practice to implement a verification task within your PBS. Proxmox Backup Server allows you to validate the integrity of your backups, ensuring they are complete and free of corruption. You can set this to run periodically (weekly or monthly) to automatically verify the backups’ consistency.
However, validation alone is not enough. Once a month, schedule an automated recovery test of a VM to ensure the solution works end-to-end. This way, you can confidently know that your backups aren’t just present, but actually recoverable, and your disaster recovery (DR) strategy is solid.