Table of Contents
The Wake-Up Call: A Beeping Sound in the Night
With this blog article I am creating a new category which is all about Home Lab deployments and related topics.
It all started with a loud beeping sound in the middle of the night. My wife woke me up, understandably annoyed, and demanded to know what was causing the noise. Still half-asleep, I quickly realized it was coming from my office. My APC battery backup had failed, with the “battery replace” indicator flashing constantly.
In a sleep-deprived state, I disconnected the APC and rewired my rack to draw power directly from the wall outlet. The result? An unplanned reboot of everything in my home lab.

A Sign to Move On
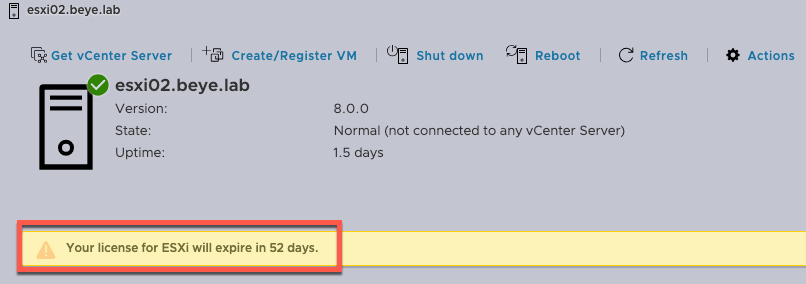
When my VMs running on VMware ESXi finally came back online, I noticed something important: my VMware license was about to expire. Rather than renewing, I took it as a sign to finally do what I’d been planning for a while—migrate to Proxmox, an open-source hypervisor that I’d heard great things about.
First Hurdle: The Blackout
In my home lab, I am running two Intel NUC devices. The first thing I needed to do was migrate all workloads from one to another to free up the node to install Proxmox.
Thats where my first problem started to begin. I created the bootable USB stick and wanted to start the installation process but no matter what installation option I chose the screen immediately went black and I had no output anymore. I tried different boot parameters in GRUB to define the screen resolution but nothing worked. So I thought great before my journey started it already end! But then I just tried to unplug and plug back in the HDMI cable (plug and prey) and … I finally had an output. If I try that earlier it saves me some hours.
Migration from VMware to Proxmox: Easier Than Expected
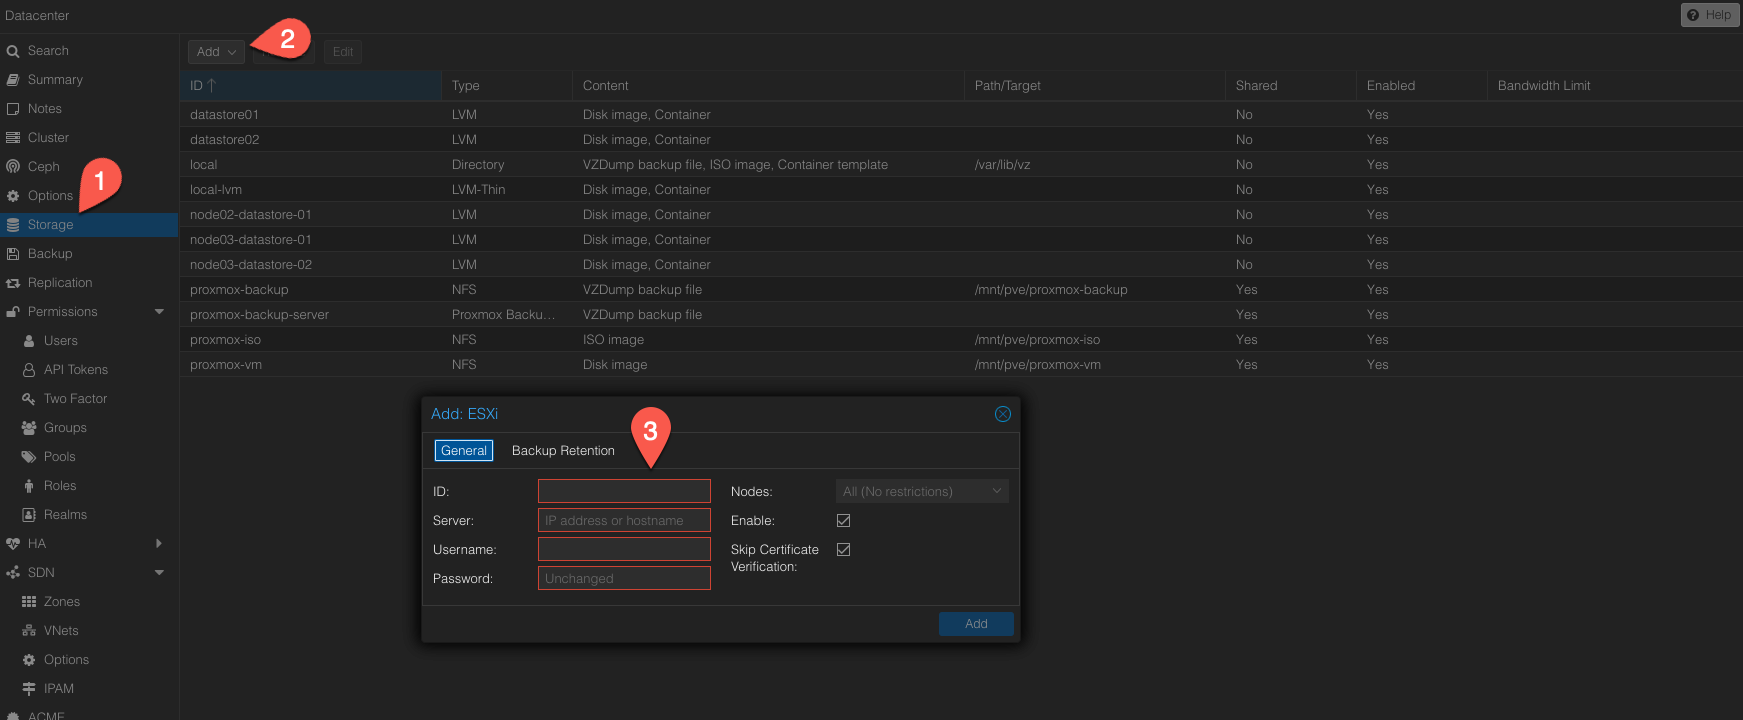
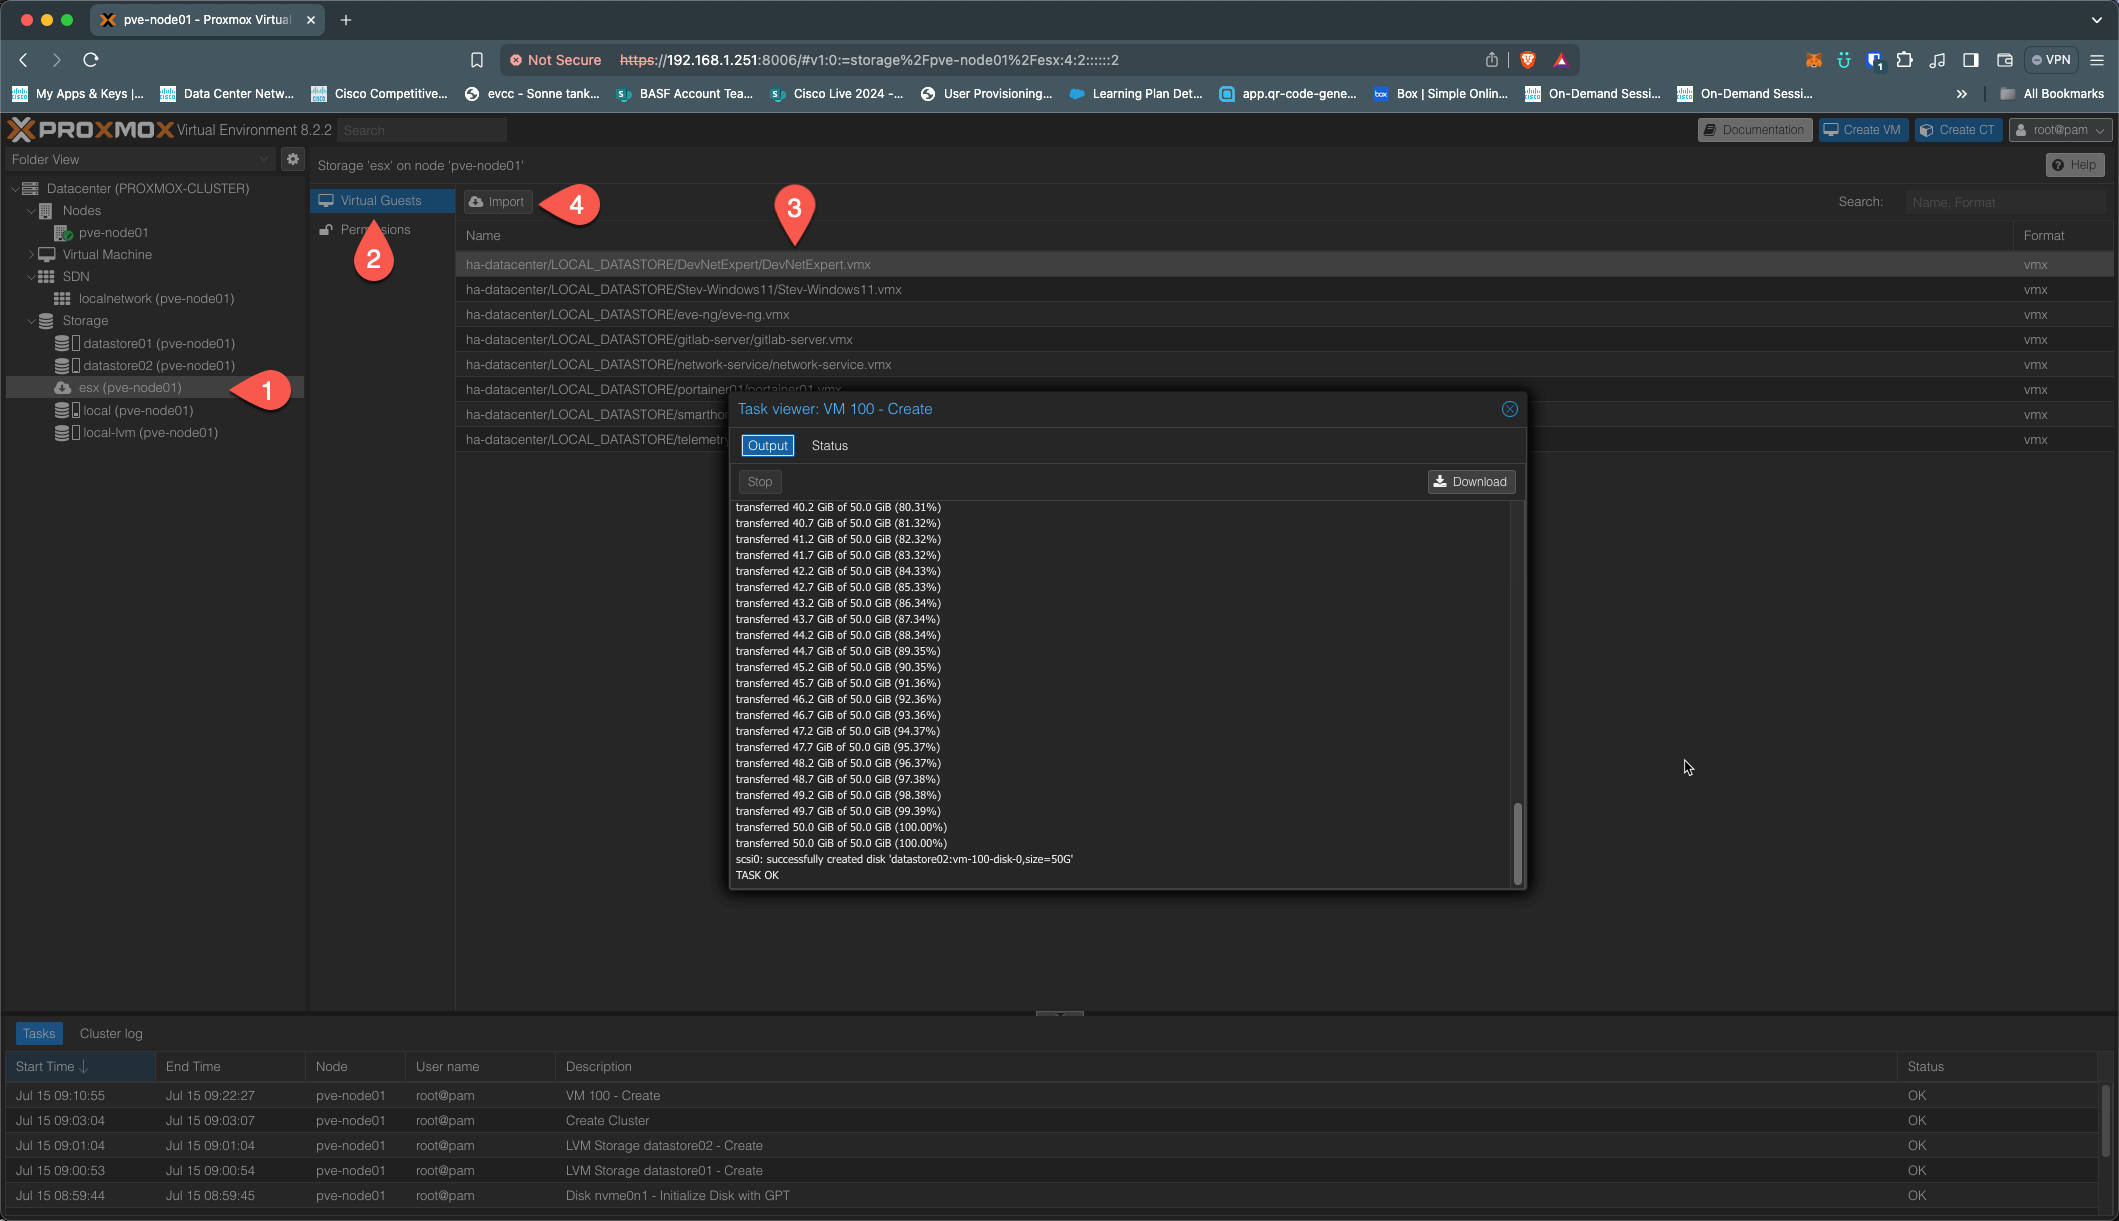
The migration itself, which I thought would be a major headache, turned out to be quite simple. I added my VMware storage to Proxmox and followed the steps in this guide. Despite my 1Gbit network limiting transfer speeds, I successfully migrated all my VMs.
After the migration, I made sure to follow Proxmox’s best practices for VM configuration:
- CPU: I set the CPU type to “host” since both my NUCs have the same architecture.
- Network: I switched to VirtIO for minimal overhead.
- Memory: Enabled the “Ballooning Device” for better memory management.
- Disks: Configured SCSI with VirtIO SCSI single, enabled Discard, and activated IO threads.
- Qemu: Installed the QEMU guest agent in all VMs for improved host-guest communication.
For the most part, the transition went smoothly, especially with my Ubuntu-based VMs. The only minor hiccup was updating the interface name in the network config due to a change in the naming convention.
Windows 11 Bluescreen: A Blast from the Past
One of my VMs running Windows 11 wasn’t as cooperative. After the migration, I was greeted by the popular bluescreen. I tried safe mode, installed the QEMU driver, and rebooted—only to be met with the same result. After some digging, I found the solution: set the CPU type to x86-64-v2-AES.
This simple change fixed the issue, and the VM booted without further problems.
Building a cluster
With the first NUC running smoothly, it was time to install Proxmox on the second one. The installation took some minutes, and I quickly set up a cluster. While a third node is typically recommended, I repurposed an old ESX node for the job.
Creating the cluster was surprisingly straightforward, and within an hour, everything was up and running.
To create a cluster just follow the instructions:
https://pve.proxmox.com/pve-docs/pve-admin-guide.html#pvecm_create_cluster
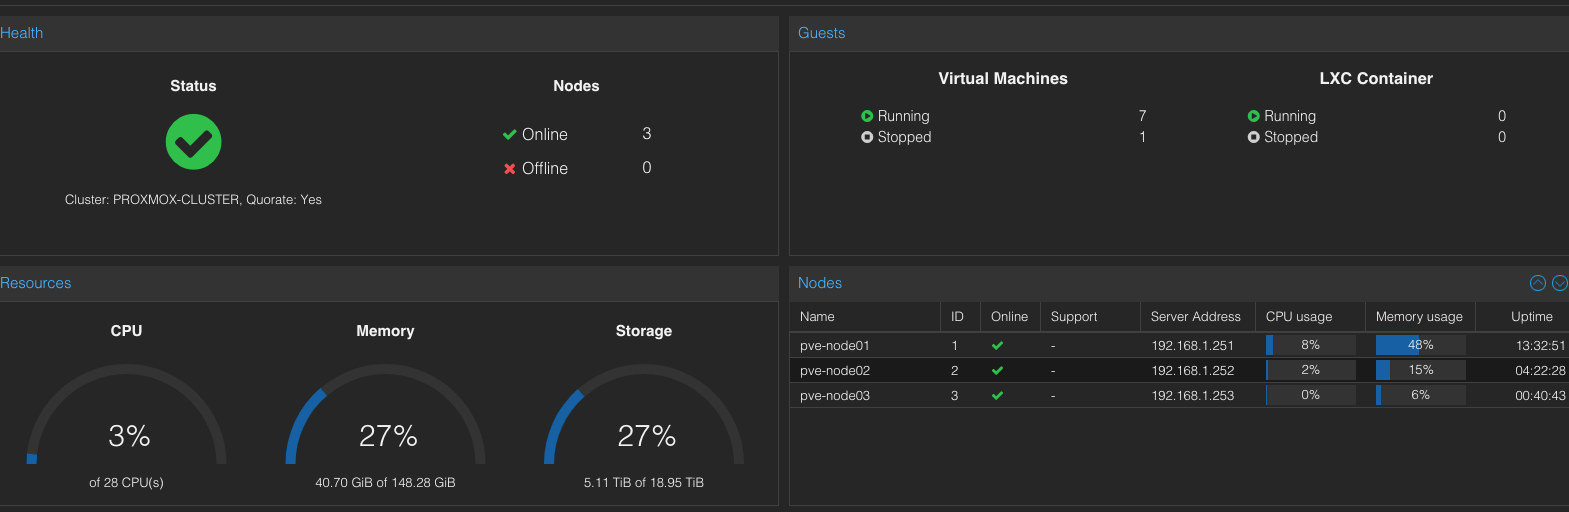
It was a matter of less than an hour to install my two nodes and create a cluster! Wow, I am amazed!
Having a cluster is fine but I also should have a shared storage. So I created a NFS share on my old QNAP added it and migrated one VM to the NFS share which works okay but is not ideal due to the performance of the NAS.
Shared Storage and Backup Solutions
Having a cluster is great, but it’s essential to have shared storage for optimal performance. I created an NFS share on my QNAP NAS and migrated a VM over. Though the performance isn’t great, it works for now.
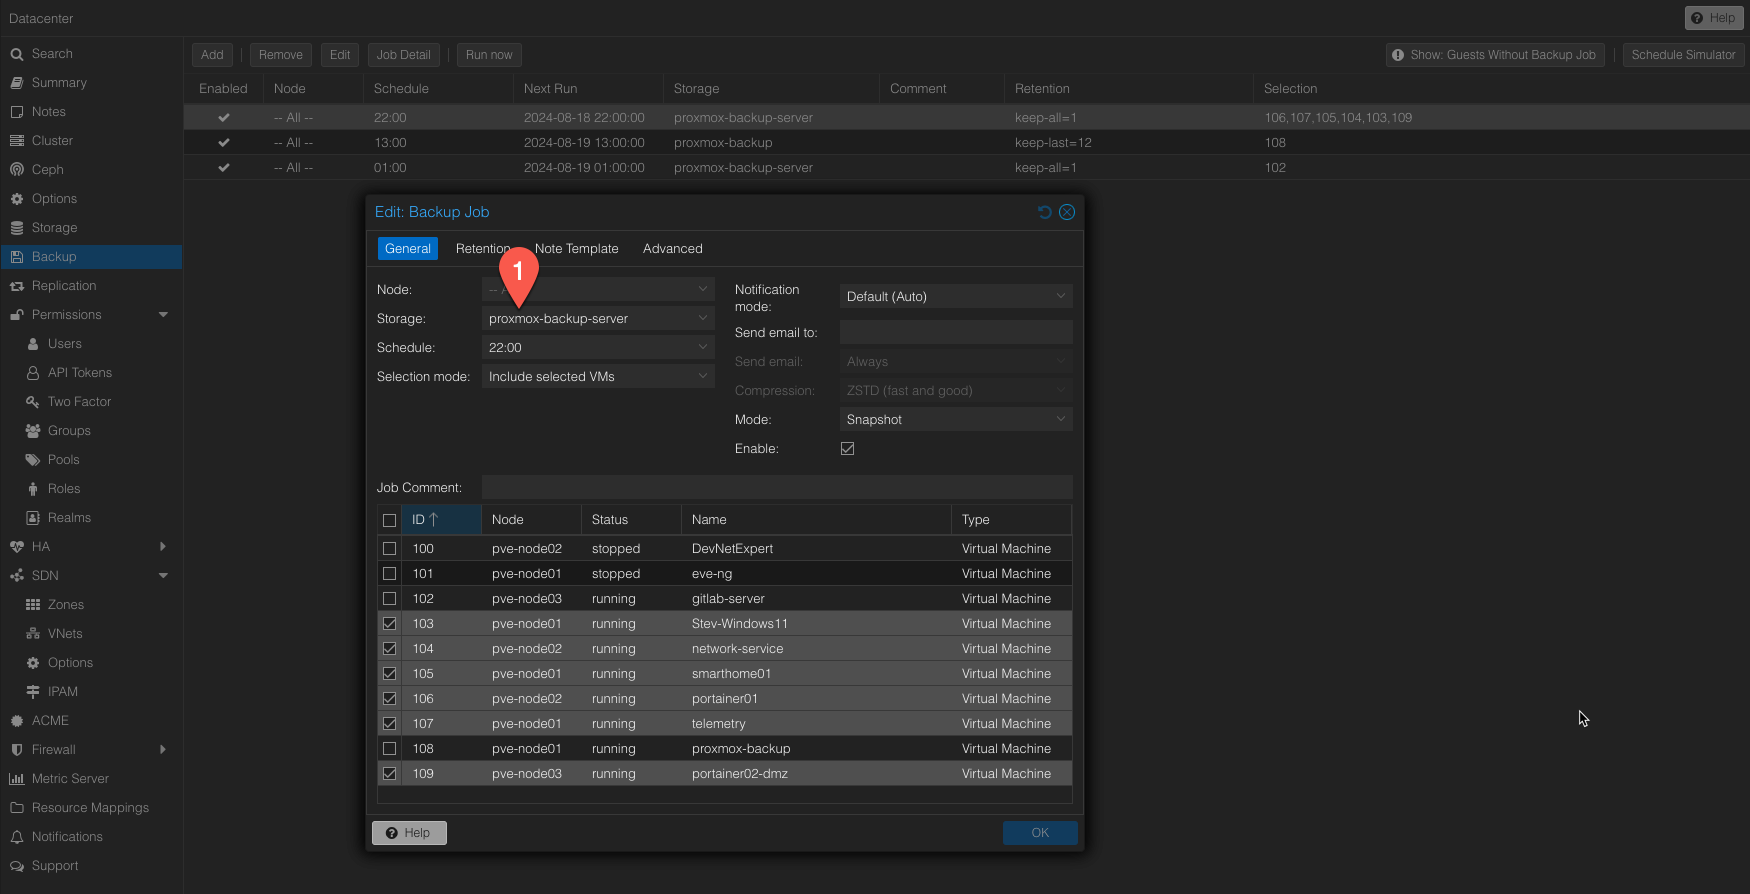
Next, I explored Proxmox’s built-in backup functions—something that was long overdue in my home lab. Setting up scheduled backups to an NFS share was simple, and yes, I tested the restore process too. It worked like a charm.
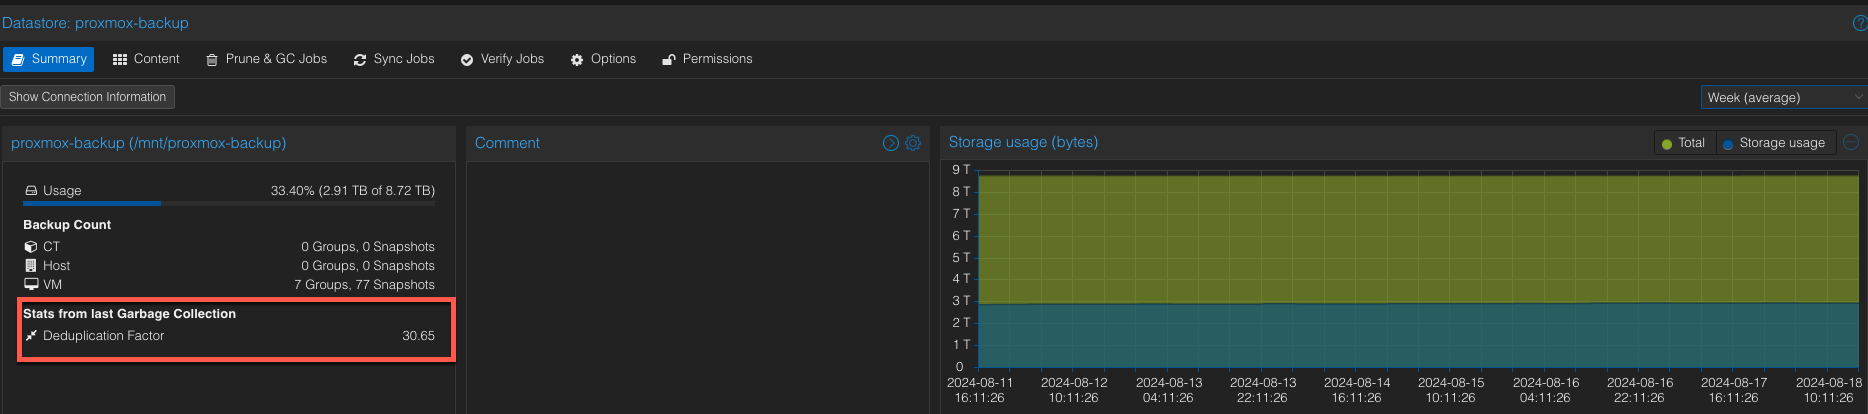
Proxmox also offers a dedicated backup server with advanced features like deduplication. I added this to my setup, created a new backup schedule, and was impressed by how efficiently it worked.
Backup Issues and Workarounds
While I’m overall happy with the setup, I did encounter some issues. Specifically, the VM running on NFS storage occasionally hangs right after a snapshot is taken.
The only solution so far has been to manually reboot the VM. I’m still looking into a more permanent fix for this.
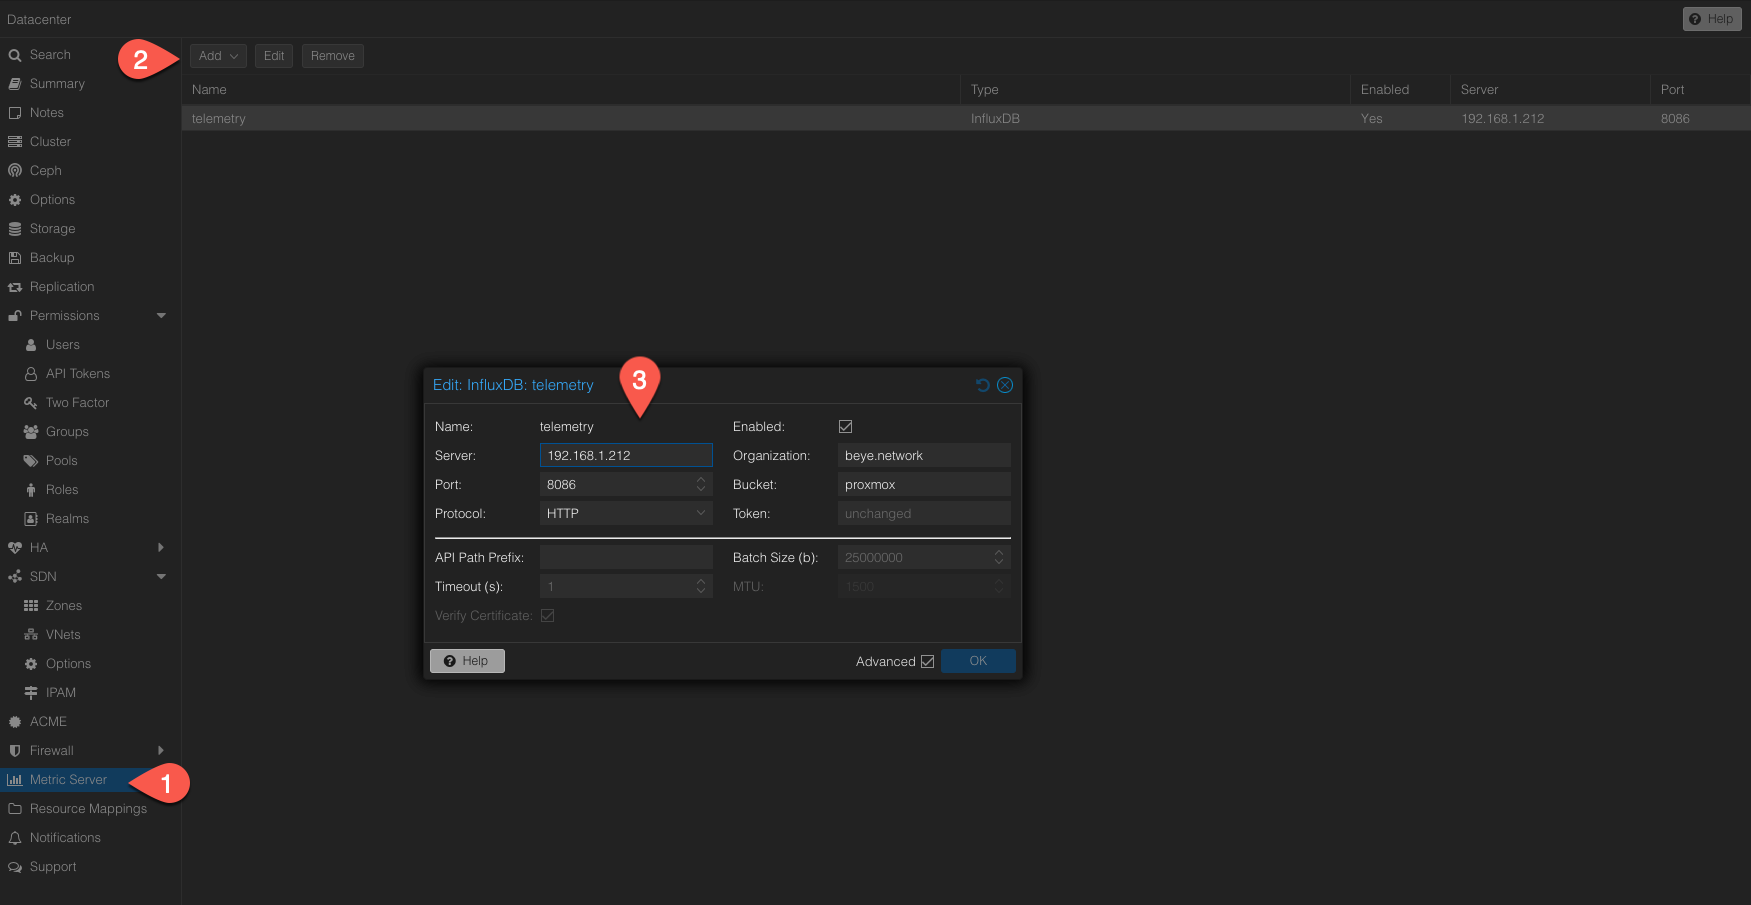
Telemetry server
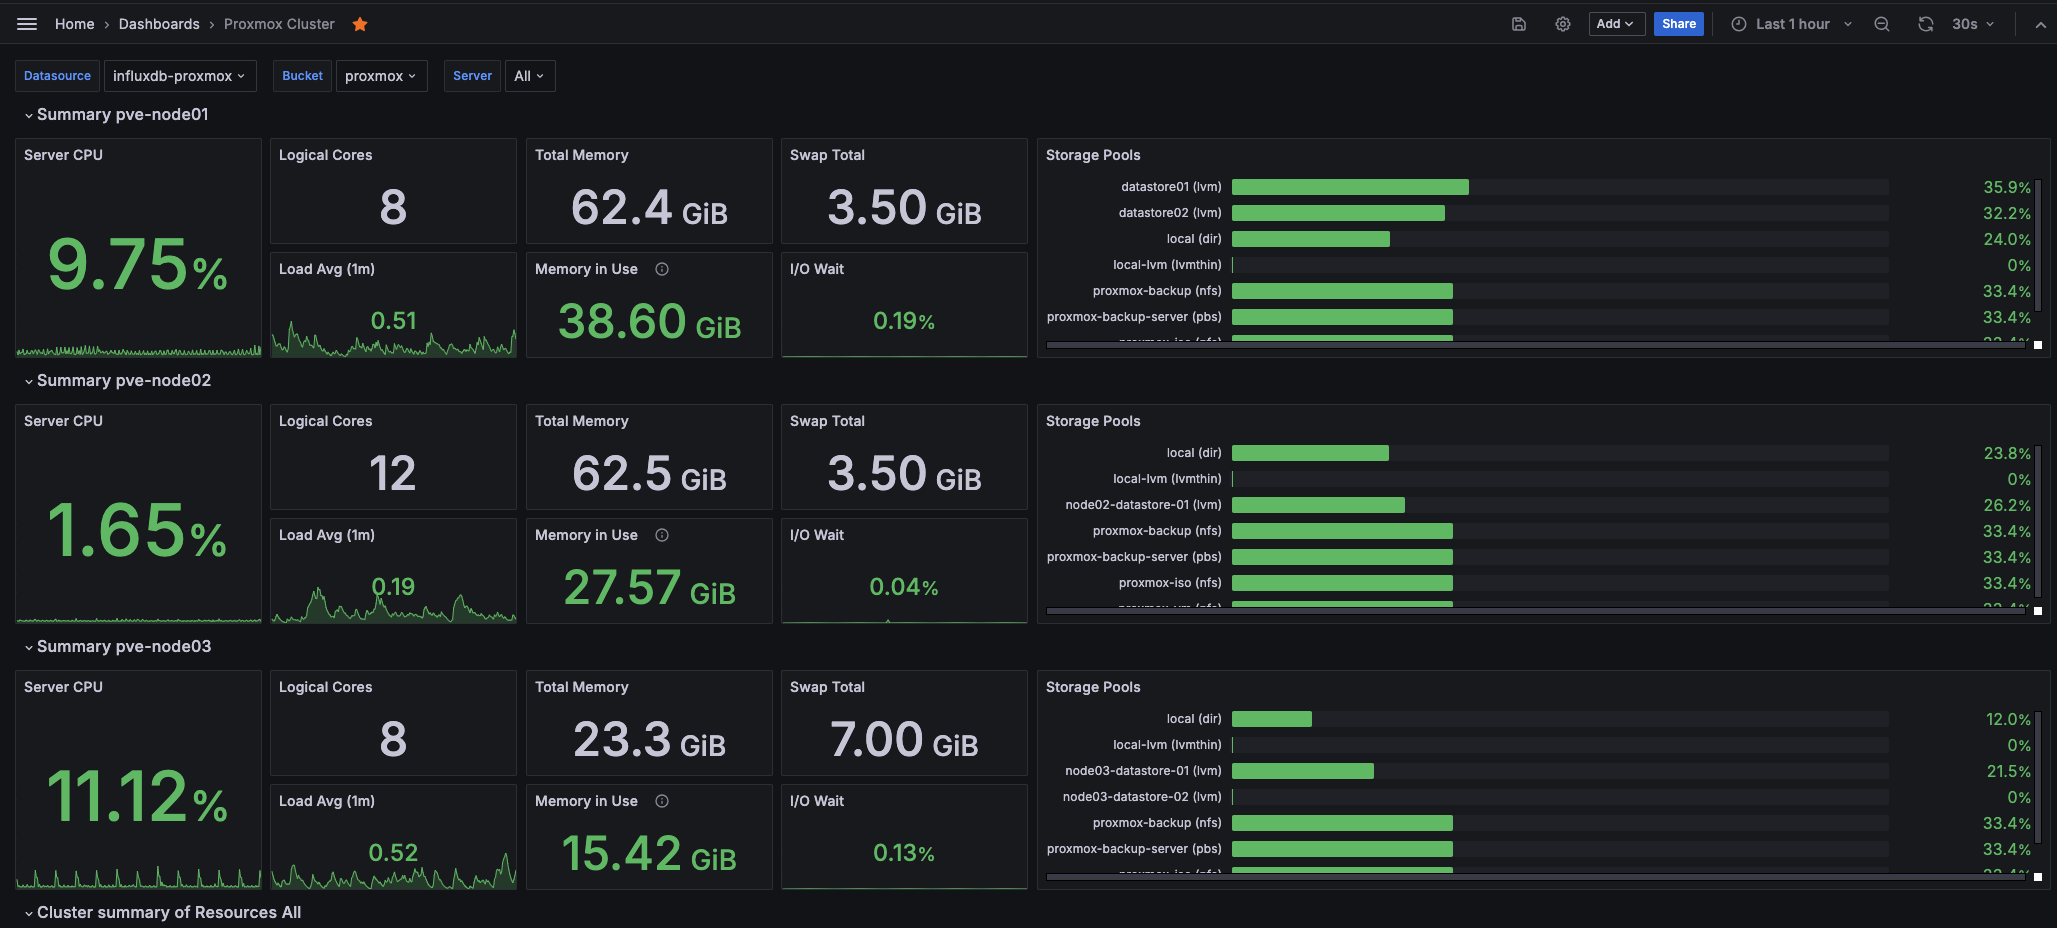
While exploring Proxmox’s features, I discovered its telemetry capabilities. You can connect Proxmox to an InfluxDB server and monitor the entire cluster via Grafana. By importing this dashboard, you can get detailed statistics on your cluster.
The level of insight this provides is incredible.
Importing OVA
If you want to import a VM from a vendor, they will most likely provide you with an OVA file. So, how do you import an OVA into Proxmox? Unlike ESX, the process isn’t as straightforward, but it’s manageable with the right steps.
Here’s how I successfully imported some VMs for testing:
1. Extract the OVA file
An OVA file is essentially a tar archive that contains a .vmdk file (the virtual disk) and an .ovf file (metadata). You need to extract these files first.
Use the following command to extract the OVA file:
- tar -xvf your-file.ova
- After extraction, you’ll get a .vmdk file and an .ovf file.
2. Convert the VMDK to QCOW2 (optional)
Proxmox works better with QCOW2 images, so it’s recommended to convert the VMDK file.
- Convert the VMDK to QCOW2 using the qemu-img tool:
- qemu-img convert -f vmdk your-disk.vmdk -O qcow2 your-disk.qcow2
3. Create a new VM in Proxmox
- Go to the Proxmox web interface.
- Create a new VM: Set the VM ID, name, and other options as desired.
Skip adding a disk during creation.
4. Import the Disk to the VM
- Import the converted disk (qcow2 or vmdk) to your VM’s storage.
- qm importdisk <VM_ID> your-disk.qcow2 local-lvm
Replace <VM_ID> with the ID of your VM and local-lvm with your storage name.
5. Attach the Disk to the VM
- Go to the hardware tab of your VM.
- Add the imported disk as a SCSI or VirtIO disk.
- Remove the unused disk if any.
6. Adjust VM Configuration (optional)
- Check the Hardware settings of the VM and ensure network adapters, memory, and CPUs are set as needed.
7. Start the VM
- Start your VM from the Proxmox web interface.
Conclusion
This migration journey has been full of learning experiences, some frustrating and others rewarding. Proxmox has proven to be a powerful and flexible platform for my home lab, offering features that make management and monitoring far more efficient than my previous setup.
Pros of Using Proxmox Over ESX
Cost-Effective: Proxmox is an open-source hypervisor, meaning there are no licensing fees. This makes it a budget-friendly alternative to ESX, which requires a paid license for full functionality.
Flexibility and Freedom: Proxmox offers more flexibility, allowing you to avoid vendor lock-in. You can customize and configure the system to suit your specific needs without being tied to proprietary solutions.
Built-In Features: Proxmox comes with built-in features like backup and clustering, which are either not available or require additional licenses in ESX. This includes the ability to set up a cluster without needing a separate vCenter server.
Community Support and Documentation: As an open-source project, Proxmox benefits from a robust community that actively contributes to its development and offers extensive documentation. This can be invaluable when troubleshooting or exploring new features.
Ease of Migration: Despite initial concerns, migrating VMs from ESX to Proxmox proved to be straightforward, especially with the step-by-step guides available in the Proxmox community.
Integrated Monitoring: Proxmox integrates well with popular monitoring tools like Grafana and InfluxDB, allowing for detailed telemetry and performance monitoring out of the box.
Advanced Storage Options: Proxmox supports a wide range of storage types, including local storage, shared NFS, and more. It also provides advanced options like thin provisioning and deduplication when using the Proxmox Backup Server.
No Black Box: Unlike ESX, where some functions can feel like a black box, Proxmox is transparent, giving you full control and visibility over your virtualized environment.
Stay tuned for more posts in this new Home Lab category as I continue to explore what Proxmox has to offer and share my experiences with you!